Building a bench - Part 1
Some 20 years ago, when I first became seriously interested in woodworking, I began by making furniture for the house. Money was tight, so I used melamine-covered chipboard held together with dowels and screws, and worked on a cheap copy of the famous Black & Decker workmate in a cold, damp single garage at the end of the garden. My early skills, on the other hand, came from my father, who was a cabinetmaker and later a carpenter too, so my school holidays had been spent helping him in the workshop and on site, where I gradually learned about his craft.
 This apprenticeship stood me in good stead, and it wasnt long before I outgrew the folding bench and made my first real workbench: a piece of 19mm MDF that was attached to the garage wall along its back edge, and supported at the front by two pine legs.
Looking back, the things I made may have been pretty poor, but I was very proud of them at the time, and through their making I developed my skills, advanced to using softwoods, and discovered the joys of a well-tuned hand plane, sharp chisels and a reasonable quality handsaw. Another workbench followed, this time made from yellow pine, hinged at the back and with removable front legs so that it could be folded down every evening to make room in the garage for the car!
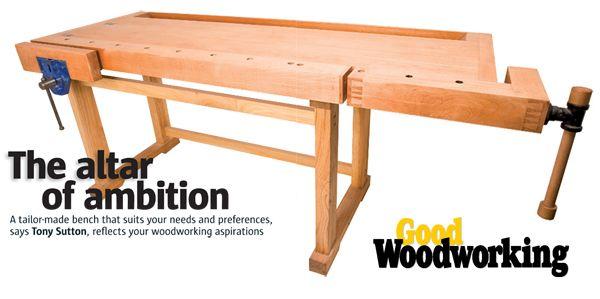
By the time we moved house, my woodworking needs had changed again: I was working almost exclusively with hardwoods, and to a standard that I felt justified the dedication of the new garage to service as a workshop. The heart of any workshop, of course, is the bench. I'd go so far as to say that, in being tailored to your particular needs and preferences, your ideal bench will reflect your woodworking aspirations. My own skills have developed, for instance, to a point where I only use power tools for rough dimensioning; the majority of my joinery and all my finishing is done with hand tools. This approach calls for a strong flat datum surface on which to work. With the acquisition of my new workshop, then, came the need for a new bench.
Design considerations
I decided to build the bench from beech and oak in the common European form, not least because the mass afforded by this design is optimal for using hand tools. I also followed tradition in positioning a face vice on the left-hand of the bench, and having a tail vice to hold stock flat against the top and facilitate hand planing. In the past, I'd found having a face vice mounted on the end of the bench to be an unsatisfactory arrangement. However, as I was undecided whether to use a traditional European style L-shaped tail vice or Veritas twin-screw type, I elected to build the bench and decide on the tail clamping method later!
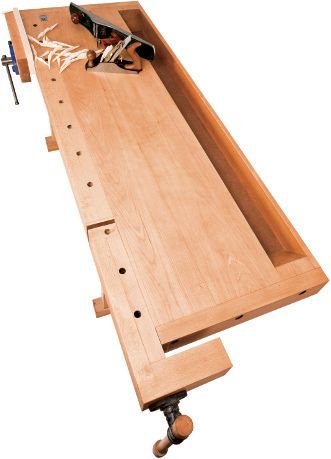
The key areas in which I chose to deviate from the traditional design were the front apron, the tool tray, and the bracing of the trestle. The front apron of the bench is 90mm deep and 90mm wide to provide a very solid and rigid work area for chiselling and sawing; it also offers a wide surface area onto which work can be clamped. The bottom of the tool tray, meanwhile, lifts out in four sections to facilitate easy rear clamping of workpieces too.
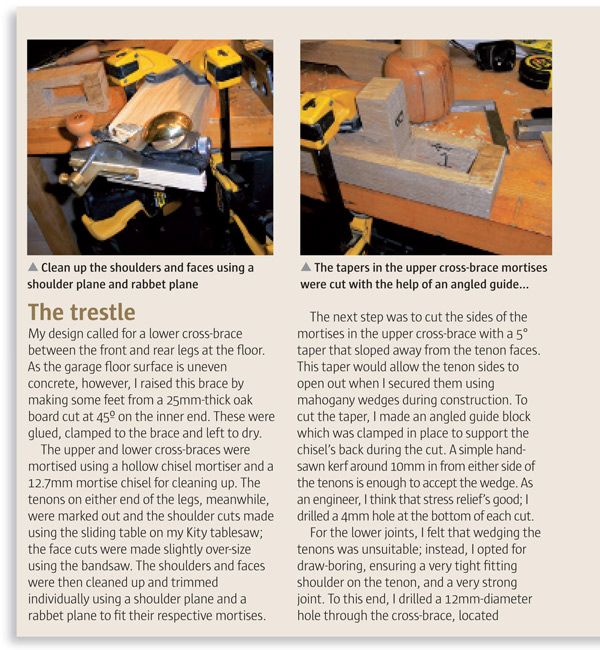
As my new workshop is essentially a single garage, space is at a premium, so I need to be able to store tools under the bench. Thus the rear of the trestle has two rails, while the front has only an upper rail, allowing portable machinery to be fitted underneath when not in use. I can't see that I'll be moving any time soon, so I decided to make the construction of the trestle section using traditional joinery techniques rather than knock-down methods. As a result, all joints are wedged mortises; several also use draw-bored dowels to provide additional rigidity and stability.
Footprint aside, perhaps the most critical dimension in a bench is the working height. Research revealed that while the tops of most proprietary benches are between 830 and 970mm high, in order to hand plane boards comfortably, my 5ft 8in frame calls for a working height of just 870mm.
Construction: sizing up To start with, all the boards were run through the planer and thicknesser to take them close to their final dimensions. I took care to remove the same amount of material from both sides of all boards to avoid movement after machining, and removed very little material from the 55mm thick beech boards so as to retain as much thickness as possible for the top. With the machining out of the way, I planed all surfaces square with a jointer (mine is fitted with a fence), and then smoothed all surfaces using a No.41/2 smoothing plane.
The bench top
As the wood had been lying in the workshop for a couple of weeks since machining to dimension, I hand planed the sides square and also planed a little hollow along their length to allow for future shrinkage as the wood dries out over the years. The boards were then glued up and clamped. Once dry, I ran a 12.7mm router cutter against a clamp guide across the top and bottom of each end to form a tenon; the overhang at the ends was then removed with a circular saw.
The boards for the apron were cut to length, and slots were routed in the end pieces to receive the tenons on the bench ends; a set of asymmetrical dovetails were also cut to join the front and the left-hand side piece, giving extra strength to the wide apron. The front was then glued to the bench top, while the side pieces were bolted in place using 8mm coach screws rather than glue so as to allow for movement in the timber across the benchs width. With the apron in place, I fitted the face vice to a block of beech that was glued and screwed to the underside of the bench-top.
View part 2 of the build here
- Log in or register to post comments


| Articles | Articles | Articles | More | Subscriptions | Resources |