Felder competition winners - unveiling excellence...
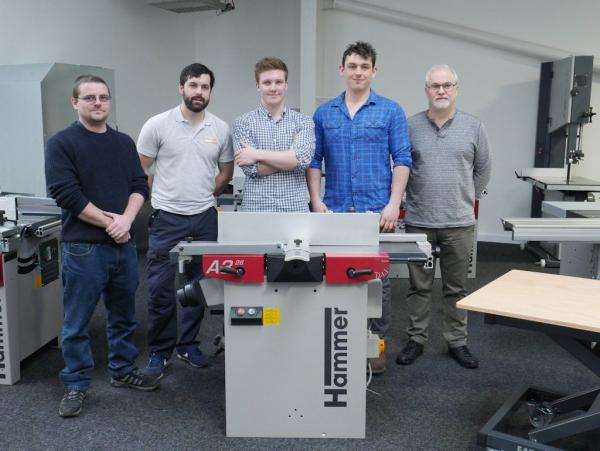
The Final Five in the Felder UK HQ showroom, behind the first prize of the coveted A3-26 planer/thicknesser
As many of you will know, we have been running the Felder 60th anniversary competition in both magazines since the middle of last year. While we love giving prizes away, it’s even better when we can get you, the readers, actively involved and making things especially for this purpose. While it’s easier to answer a simple question to win a prize, this competition required a little more effort on your part, and set the task of asking you to make a piece of furniture over a six-month period, or submit a piece that had been previously made.
Sheer diversityAs the months went by, we were growing increasingly impressed by the calibre of entries received as well as the sheer diversity of the pieces. It was also reassuring to see such a high level of entries from young woodworkers, and equally as satisfying to see the seasoned professionals also applying.
By the time the closing date of the competition came around, we were faced with the arduous task of having to choose our Final Five, each of whom would be invited to a special judging ceremony held at Felder UK’s Milton Keynes HQ. Furniture making experts Peter Sefton and John Lloyd would also be in attendance, passing on their comments and doing their best to choose a valiant winner based purely on the piece they had submitted as opposed to factors such as age of the entrant, experience level, etc. It was agreed by all that the pieces should be judged fairly and on face value.
So once each of the email entries had been looked at and assessed as thoroughly as possible, it was a case of whittling them down over a period of a few weeks until we had decided on the Final Five. This was no easy task as each of the people who entered were all winners in their own right, but we had a job to do, so battle on we did, until we were all in agreement as to who should be put forward. The next step was to contact the finalists and let them know they had been chosen.
I was thrilled to receive so many excited emails in response, and one of the finalists, Patrick Walsh, was even making the trip all the way from County Tyrone, Northern Ireland! Luckily everyone could make the date, which just so happened to fall on St. Patrick’s Day.
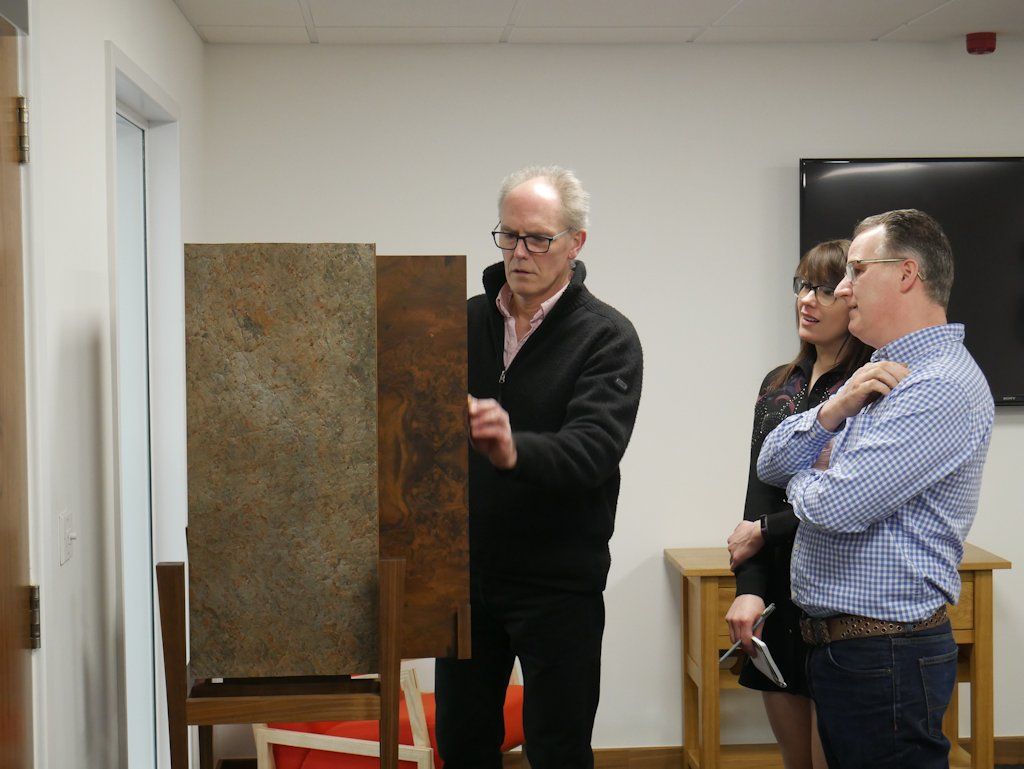
Meet & greetWith the judging date of 17 March upon us, myself and all those involved made the trip to Felder UK’s HQ to commence the ceremony and begin to make the difficult decision as to who would be chosen as the three winners. It was a pleasure to meet the finalists in person and to learn more about each of them. While a few were professional carpenters and furniture makers (Patrick Walsh and Nathan Millar) and a student at University studying 3D design (Josh Milton), there was also an aircraft technician among them (Jamie Lake), so a real mixture of skill levels and experience, which made the job even more difficult, but exciting nonetheless.
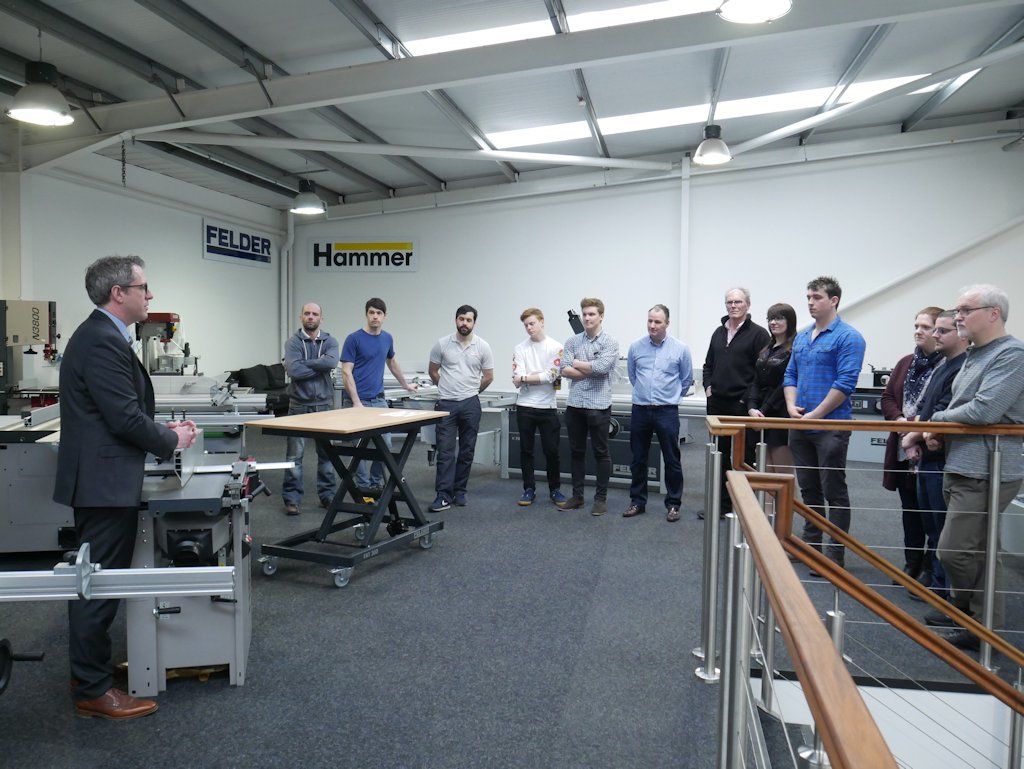
Having done the meeting and greeting and having had a chance to look at each of the pieces more closely, photos were taken of the entrants with their projects before the judging began and each of the Final Five were asked to leave the room. While out of the room they had the chance to look at some of the serious bits of kit on display in the Felder showroom, with many commenting how one day they would love to have a workshop kitted out with such machines!
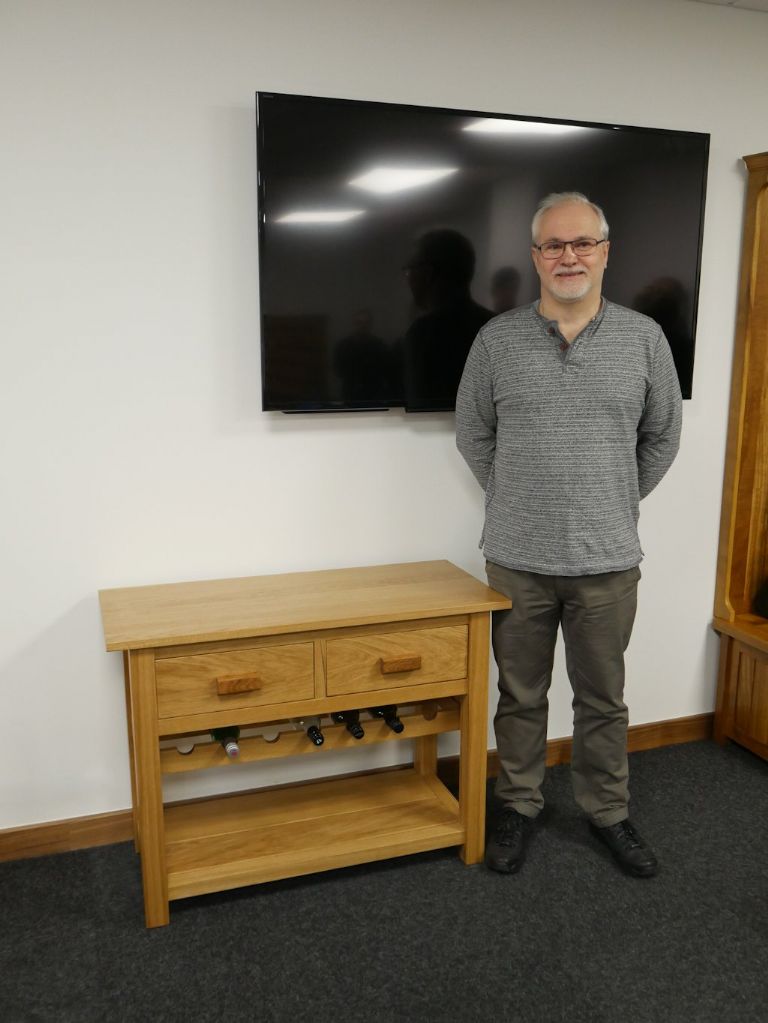

 Tony Wood with his wine table Nathan Millar with his winning walnut cabinet on stand Patrick Walsh with his hall unit
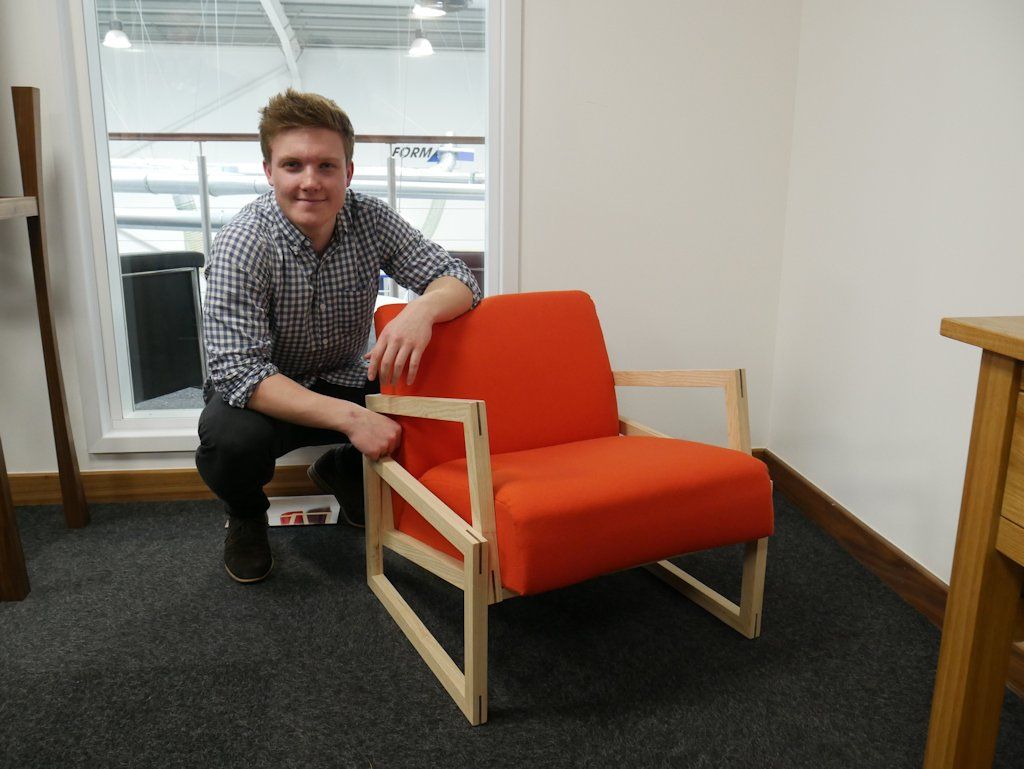
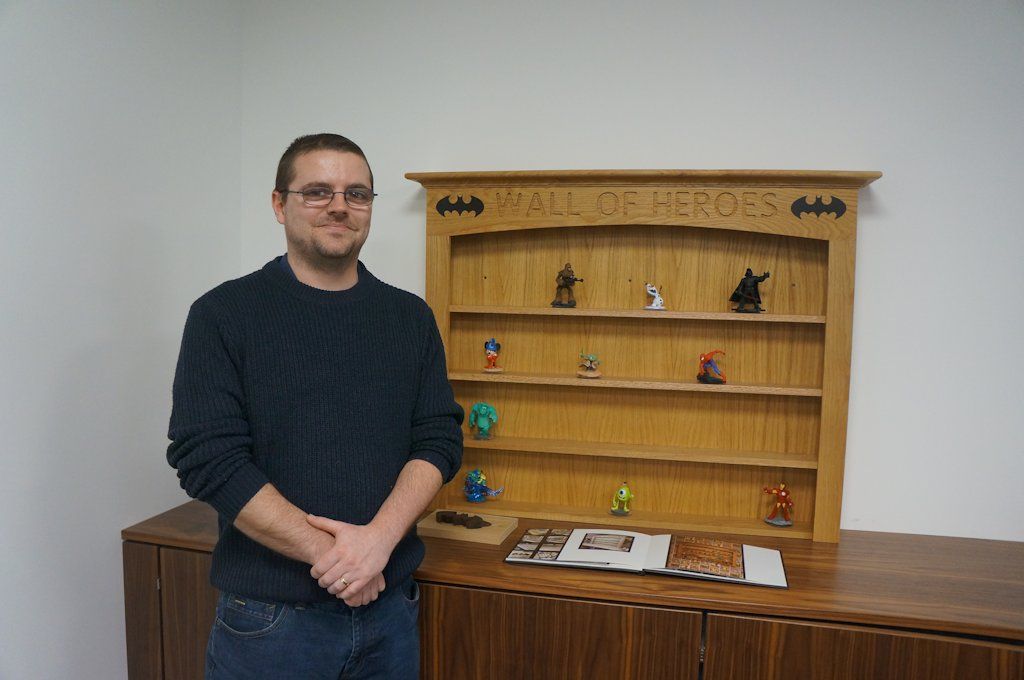 Josh Milton kneels beside his ’Tilt Lounger’ Jamie Lake beside his ‘Wall of Heroes’
Critique
Josh Milton kneels beside his ’Tilt Lounger’ Jamie Lake beside his ‘Wall of Heroes’
Critique
The judging was definitely the most difficult part of the day, and knowing only three of the finalists would receive a prize was quite a sad realisation, but we hoped that each of them would have a fantastic day regardless of the end result, and that this would be a worthwhile experience for all.
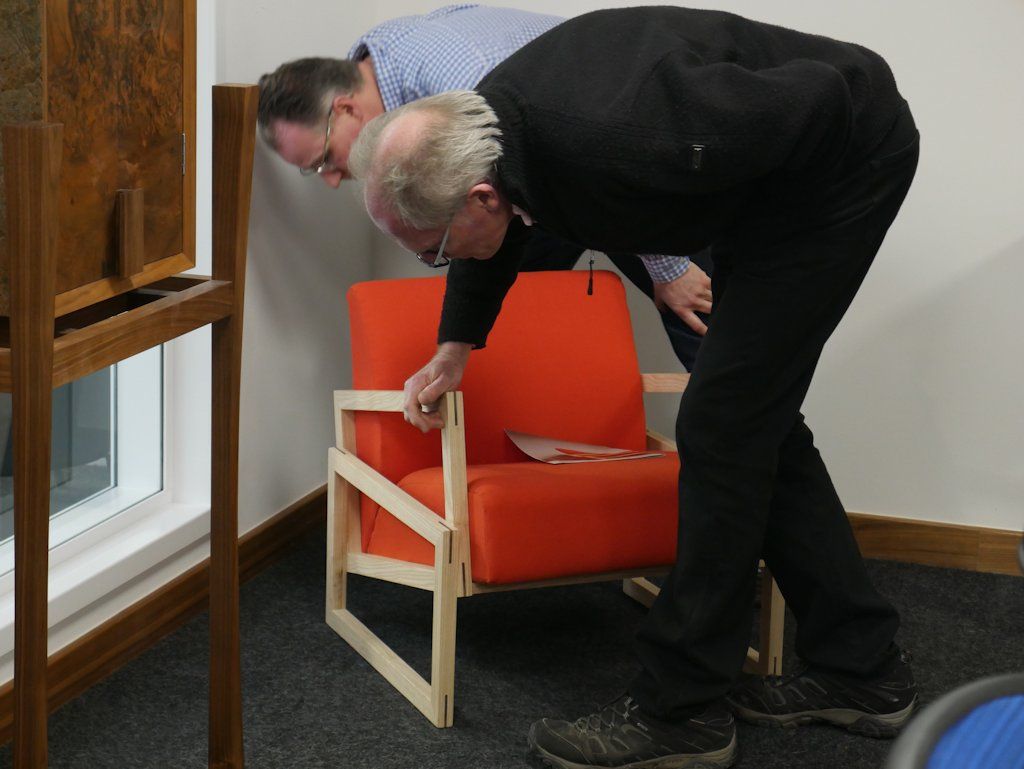
The next task was for myself, John and Peter to look at each of the pieces individually and to assess them based on various factors: quality of joints, quality of finish, material choice, degree of skill on show, and overall execution of the piece. While I am certainly no expert in the furniture making field, it was really interesting to listen to John and Peter’s comments and I certainly learned a lot about different processes, what to look for when critiquing a piece, and the importance of running your hand over surfaces to distinguish factors such as the quality of the final sanding and finishing.
Having made countless notes and giving my humble opinion, we eventually made a decision as to who would be awarded first, second and third place, but decided to break for lunch before making this announcement, just to keep everyone hanging on a little longer!
First, second & thirdHaving all had our fill of sandwiches and cakes, and being given the opportunity to talk more and mingle, it was then back to the showroom to announce who the three winners would be. It was important for me to get across to everyone just how impressed we were by the level of work, and how grateful we were to them for entering and also making the journey with each of their pieces (luckily nothing was broken in transit, much to my relief!). With everyone stood around eagerly awaiting the decision, the third place was announced, followed by second, and finally, first. While two of the Final Five could sadly not be awarded a place, it was agreed that they would each be given a smaller prize, of £75 Felder tooling credit, which we hoped would go some way to showing our appreciation.
The third place was awarded to Tony Wood for his wonderful wine table in American white oak; second place was given to Josh Milton for his ingenious ‘Tilt Lounger’; and finally, first place was awarded to the very well deserving Nathan Millar for his walnut and stone cabinet on stand, which had people talking as soon as he brought it into the board room.
The winners were then given their prizes, which for Tony was £100 tooling credit; for Josh the FAT 300 and Felder worktop surface multiplex; and for Nathan the nifty A3-26 planer/thicknesser with Silent-Power spiral cutterblock. To say he looked pleased with his prize was an understatement and it was great to hear him say how he couldn’t wait to get it back to his workshop. He’s promised that he’ll keep us posted as to what he makes using it, and it’s clear that this great piece of kit will prove a real asset to this young furniture maker and his growing business.
A great experienceAll in all, this was a fantastic day, and a great opportunity for woodworkers to meet other like-minded people, to learn about their interests and what each other enjoys making, transfer skills and opinions, as well as showing their pieces to others and receiving professional feedback. We hope that all those involved enjoyed the day as much as we did and that they can take something positive away from the experience, even if it wasn’t the first, second or third prize. Competitions, after all, are all about taking part, and a big thank you goes out again to all those who made it possible; we couldn’t have done it without you.
 John Lloyd, Peter Sefton and Tegan Foley examine Nathan’s cabinet The judges taking a closer look at the ’Tilt Lounger’
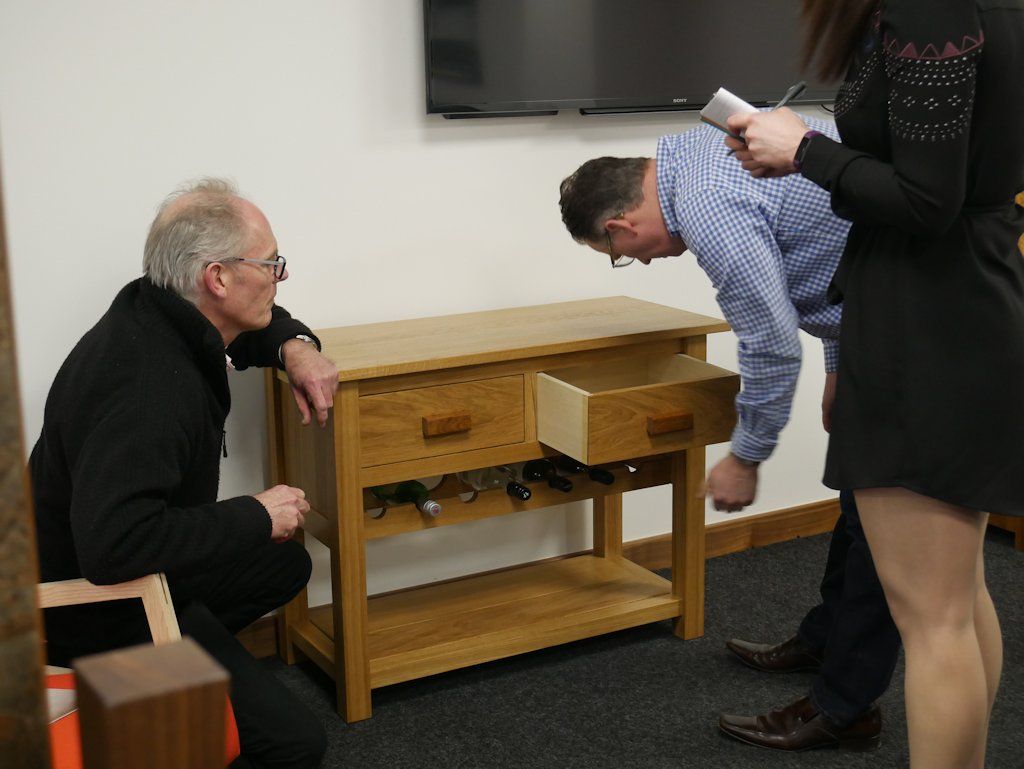
 Examining one of Tony Wood’s wine table drawers Felder UK Chief Executive Matthew Applegarth addressing the finalists and judges in the showroom
Jamie Lake - ‘Wall of Heroes’ - runner up 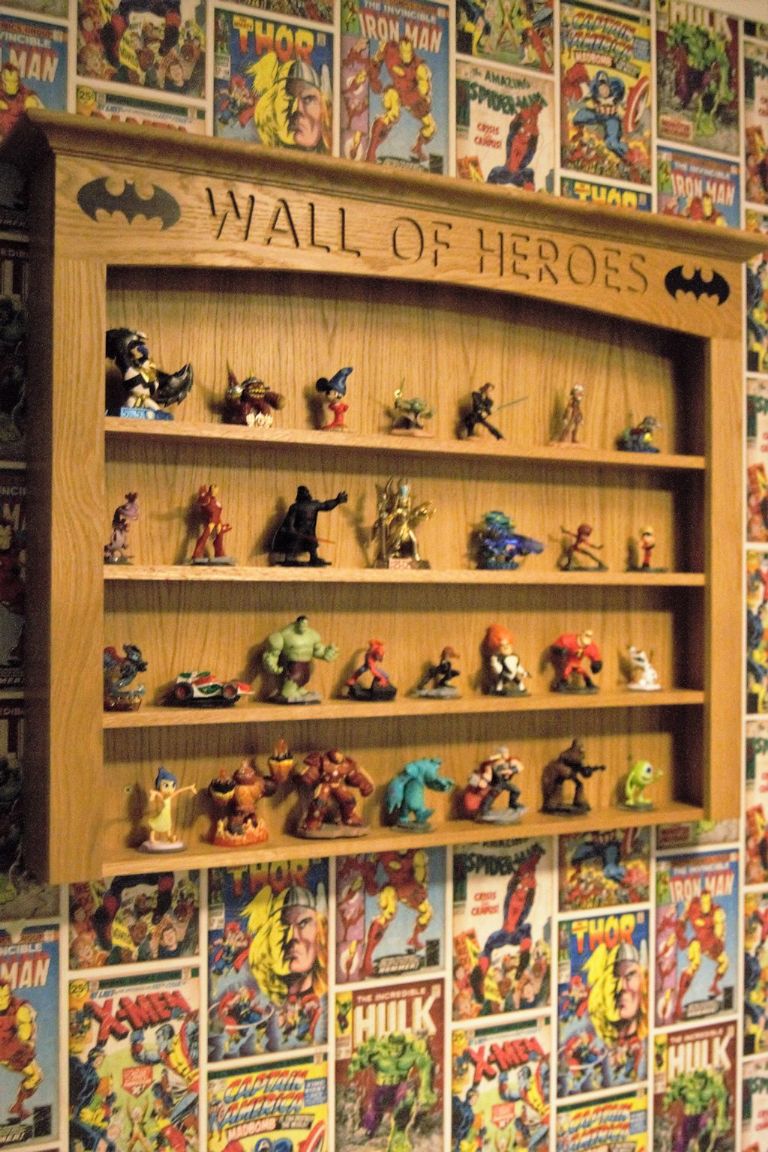 The ‘Wall of Heroes’ in situ 31-year-old Jamie made this fun piece for his son, who is an avid comic book fan. Dominos were primarily used for the joints and everything was given a good sanding before the unit was glued up. Jamie glued up the main part of the cabinet first, making sure it was square, and once the glue had set he used a router to rout out a rebate to accept a back panel. He used an oak-faced MDF panel for the back and glued and screwed this in place for strength. Lettering & shapes The letters for the ‘Wall of Heroes’ were marked out and routed on the face frame using a template. He found a Batman symbol online and printed it out, before gluing this to some 20mm-thick wenge. This was then cut out on the bandsaw, starting with the outside followed by the inside of the shape, and once cut out was tidied up using a Dremel. Inlaying Once the glue had dried, an orbital sander with good dust extraction was used to sand the inlays down flush. Any small gaps were then filled with glue before being re-sanded. He used a long 1m rule bent to the desired curve and marked this on the timber before cutting most of the waste out on the bandsaw, before tidying up on the bobbin sander. He cut the sides of the face frame to size and drilled two pocket holes in each, then glued and screwed these to the top section of the face frame. Dominos were then used to fix the face frame to the cabinet. Finishing touches Jamie purchased a cornice moulding online, ripped a part of the moulding off and cut this to size, mitring the corners. He made up some blocks and fitted these to the top of the cabinet. He then glued and finish nailed the cornice to these blocks, and once the glue had set the whole cabinet was sanded through to 240 grit, before being finished with two coats of Osmo Poly-X Wax Oil.
Patrick Walsh - ‘Iroko Hall Unit with Storage Bench’ - runner up 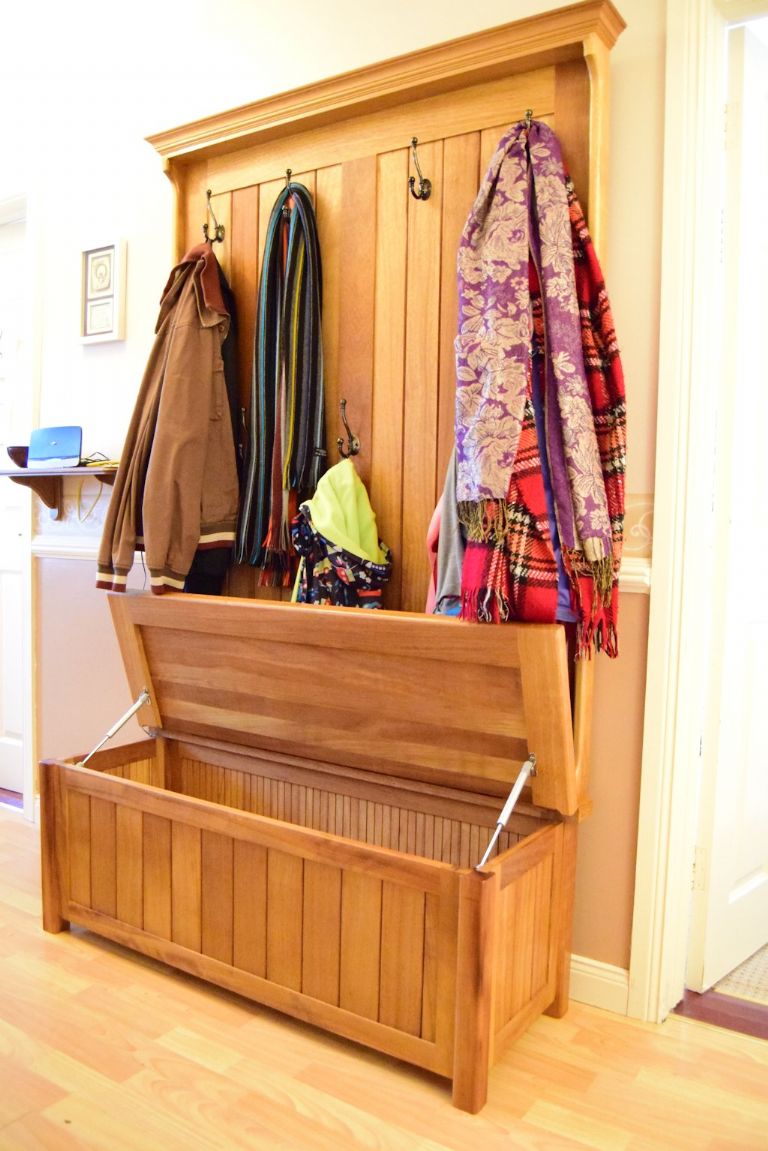
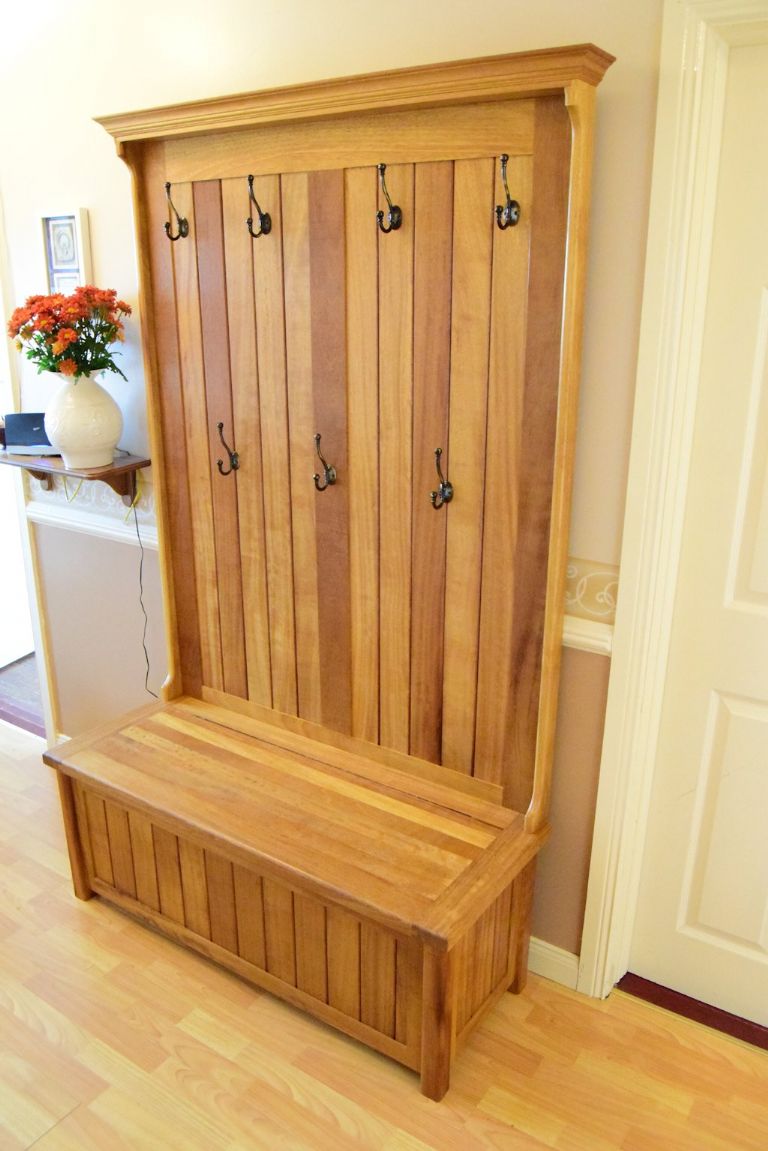 The completed hall unit, complete with coats and bags… … and in its natural state
31-year-old Patrick’s hall cabinet with storage bench is made using iroko and took some 50 hours to make, using a table saw, bandsaw, planer/thicknesser, router table and biscuit jointer.
Patrick says that seeing the competition in the magazine reminded him that he’d promised his wife a hall unit, so he set about making this one especially. As with all his designs, he simply sketched out a few ideas on a piece of ply and when happy with what he had in mind, he started to work out dimensions. Next, he drew up a cutting list and selected 50, 64 and 25mm planks.
He started by cutting and planing the timber to the required lengths/thicknesses and began with the storage chest. The corner posts were routed with two rebates to hold the main structure of the base together; this was then made with an outer frame filled with T&G boards. Lapped joints and rebates were used for construction and the base was made using 12mm ply. The chest was then glued up.
Storage chest lidIn order to make the lid section as light as possible without detracting from the intended ‘chunky’ finish, he used planed 64mm boards for the outer sides and used planed 25mm boards internally. The lid was constructed with T&G joints for the thicker boards and biscuit joints for the internal boards.
Back boardThe top section (back board) was made using 12mm T&G boards with a framed outer rim; it was then finished with a slight overhang at the top and cornice moulding was added.
AssemblyFinally, it was time to assemble the pieces together and measure for the hinged lid. Once he was happy with the dimensions, the lid was cut to size in order to suit the chest. A piano hinge salvaged from an old piece of furniture was used, and small hydraulic arms were installed internally to allow the lid to stay open.
All sharp edges were rounded over and the unit was sanded down to 400 grit. Once assembled, it was then finished with five coats of Danish Oil. Antique brass coat hooks were added to the finished piece of furniture, including lower hooks, which can be easily reached by youngsters. Patrick says he’s happy with the finished piece and his wife is too, as the school bags and coats are no longer lying on the hallway floor!
Tony Wood - ‘Wine Table’ - third place 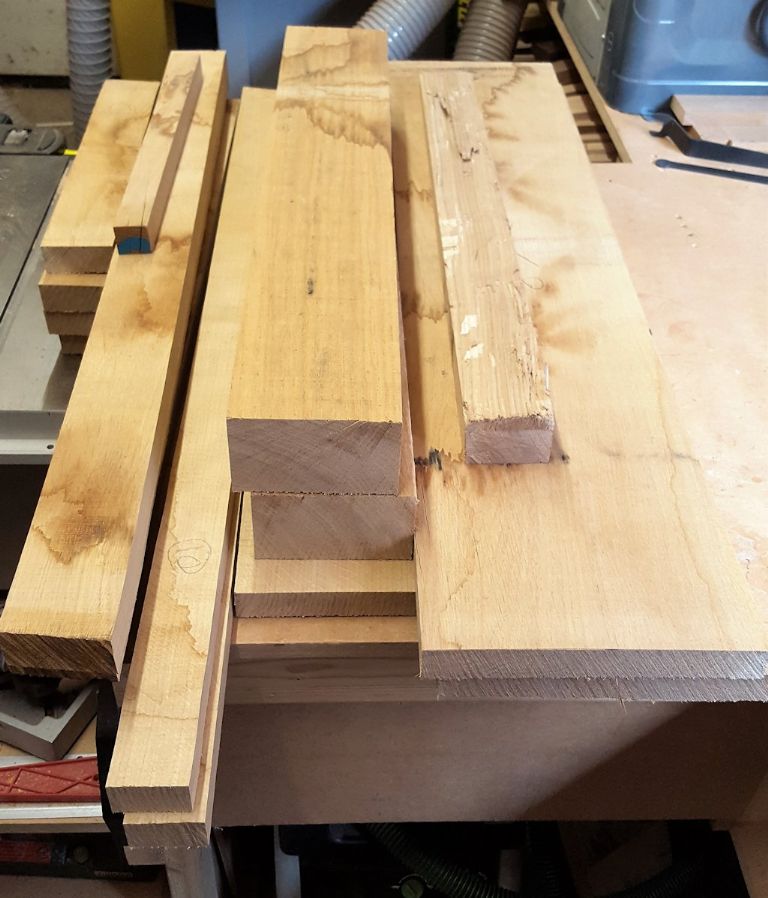
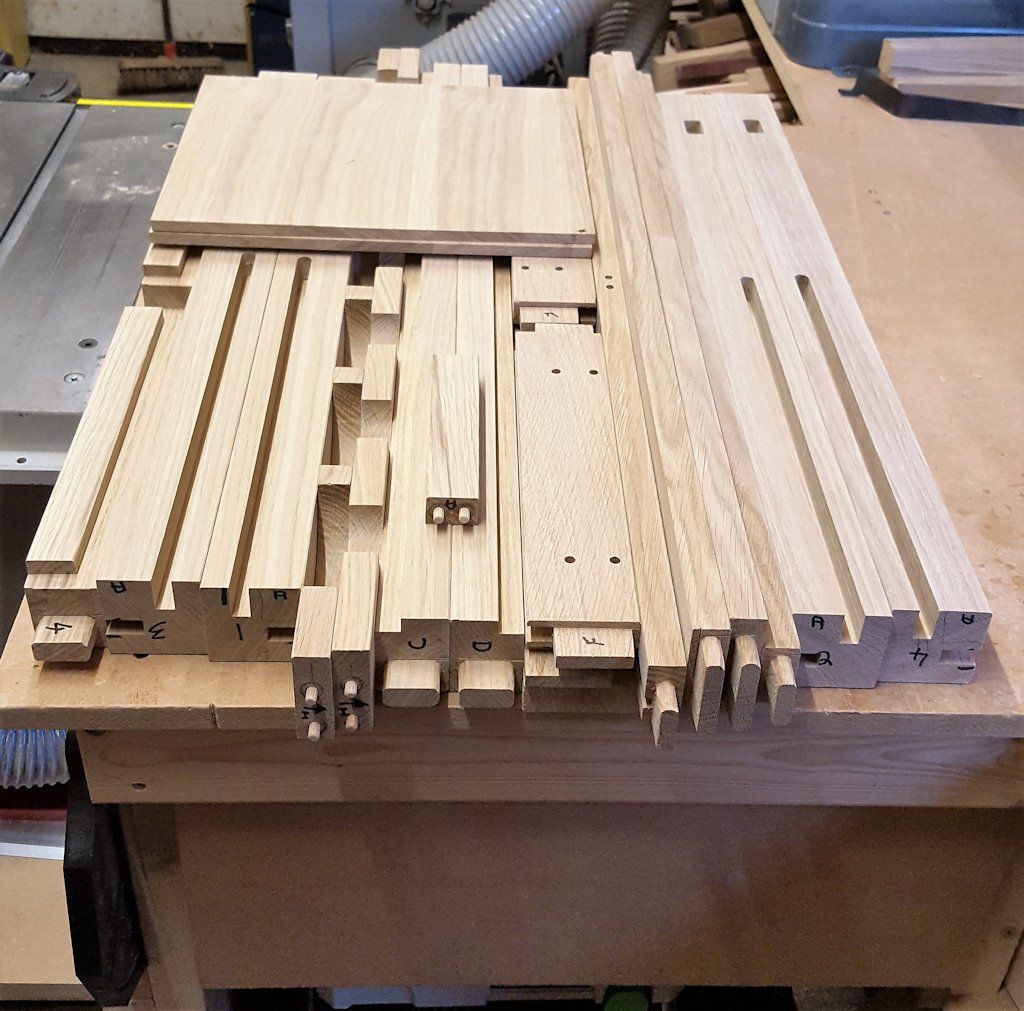 Timber in its raw form, cut oversize and ready for planing Pieces jointed and cut to size, ready for gluing up
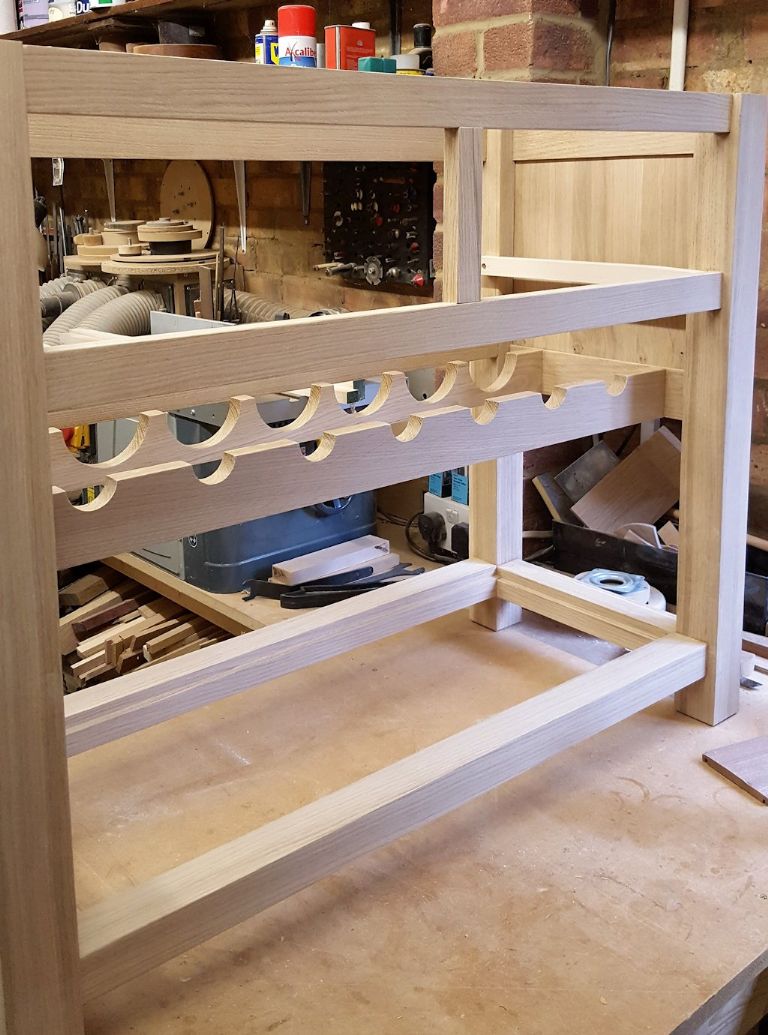
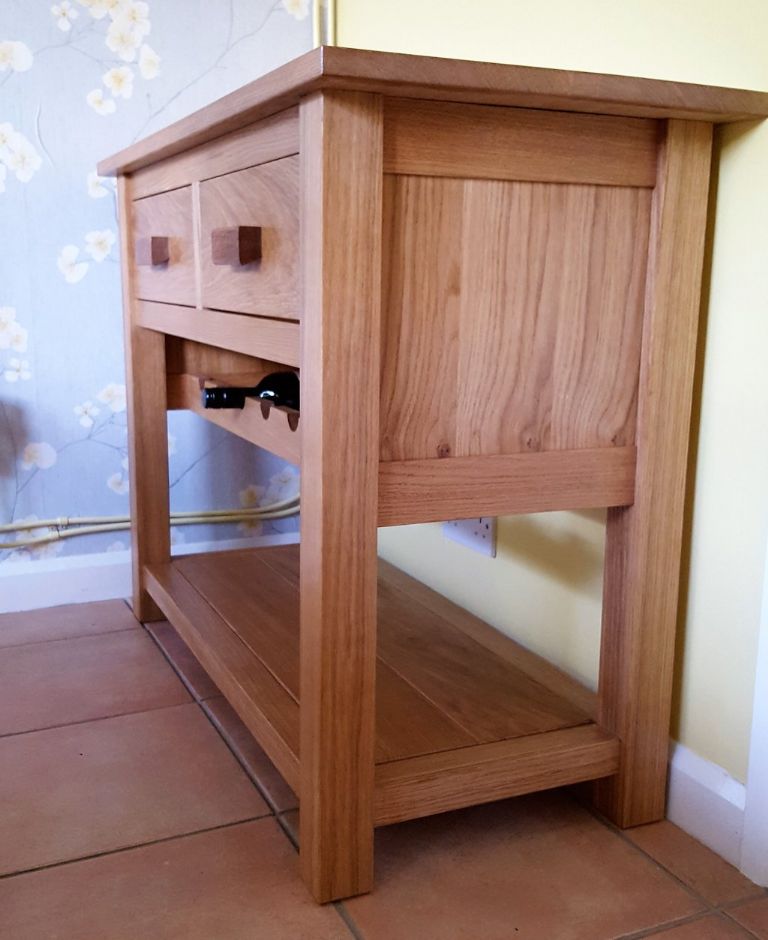 The completed frame Side view of finished wine table…
 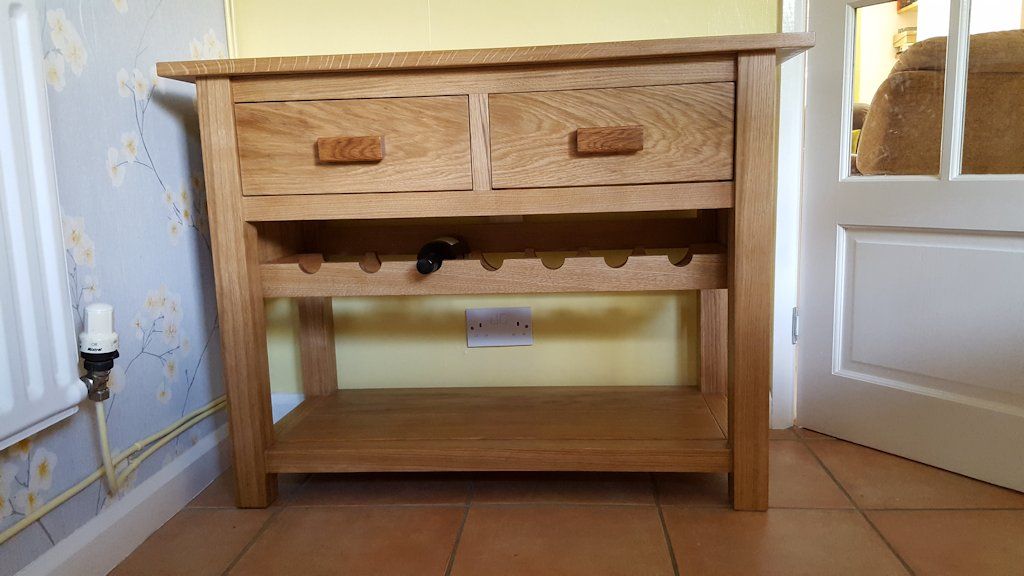 … and from the front
OVERALL COMMENTS: Good timber selection; some gaps in joints; good choice of finish
Retired Tony says that before he approaches any project, he likes to draw it in detail using a 3D drawing package, such as Fusion 360 by Autodesk, and after it has been drawn up he then works out the constructional details that enables him to produce a cutting list so he can work out which raw materials to purchase. Tony prefers to work from sawn boards, selecting those he likes from a local timber yard. For his table, Tony used a mixture of traditional joints, routed joints and dowels. The finished piece, made using American white oak, measures 1,000mm long × 450mm wide × 750mm high, and was finished using Hard Wax oil and Bison wax polish.
Josh Milton - ‘Tilt Lounger’ - second place 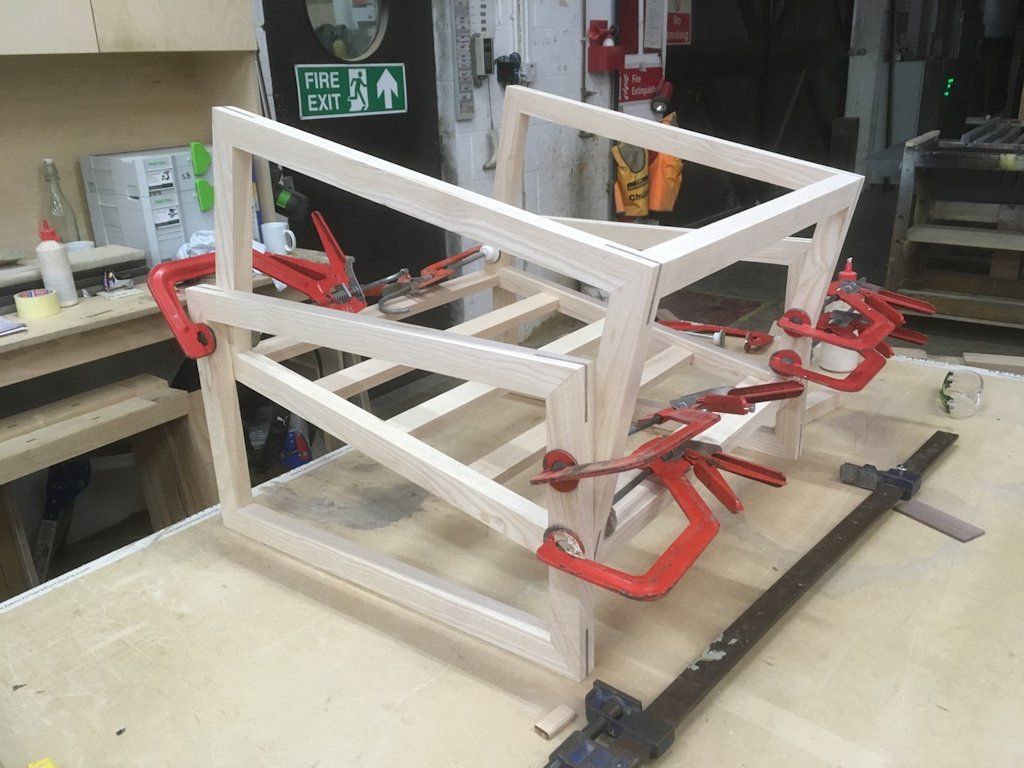
 The chair base, all clamped up Inserting one of the walnut mitres
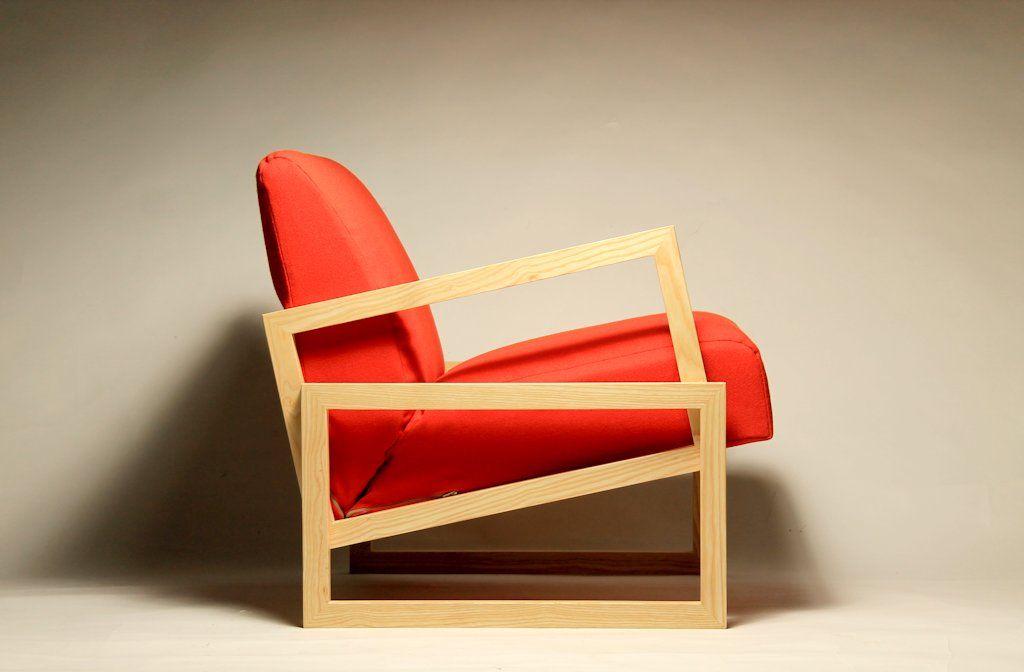
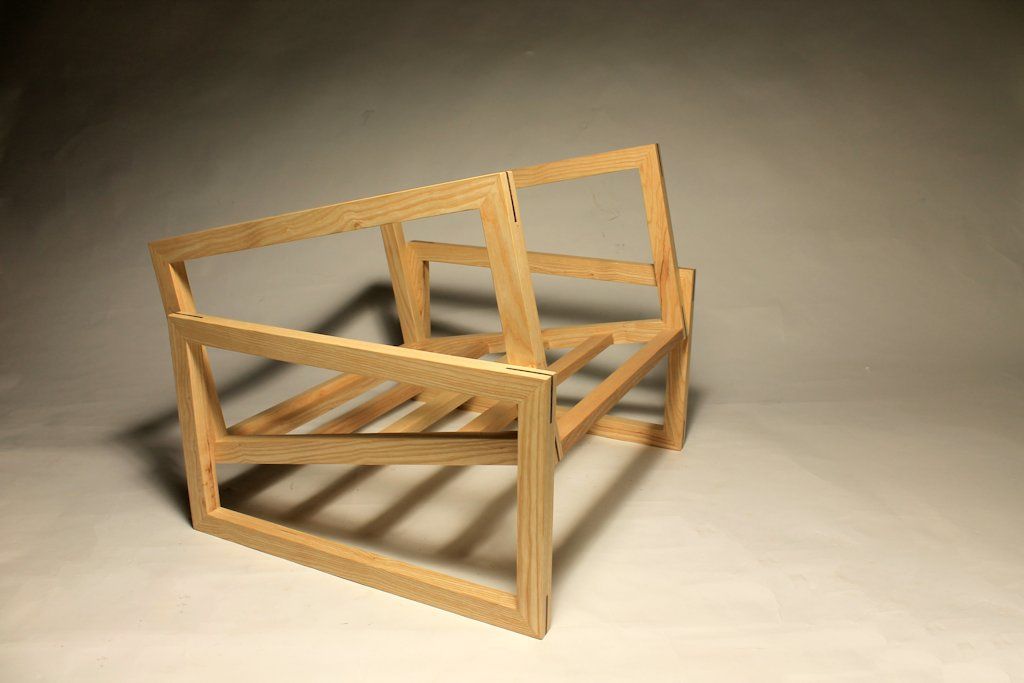 The completed chair with cushions in place… … and without, showing the simple but effective box frame
OVERALL COMMENTS: Crisp finish; simple design but very pleasing to look at; striking; good use of timber; well executed mitres
21-year-old Josh’s ‘Tilt Lounger’ was made during a University project, and was inspired by the Swiss company, Vitra. The four components which make the chair base and the arms are all identical, but the inner two are tilted back at 12° degrees. This adds a playful nature to the design as well as giving it a striking aesthetic.
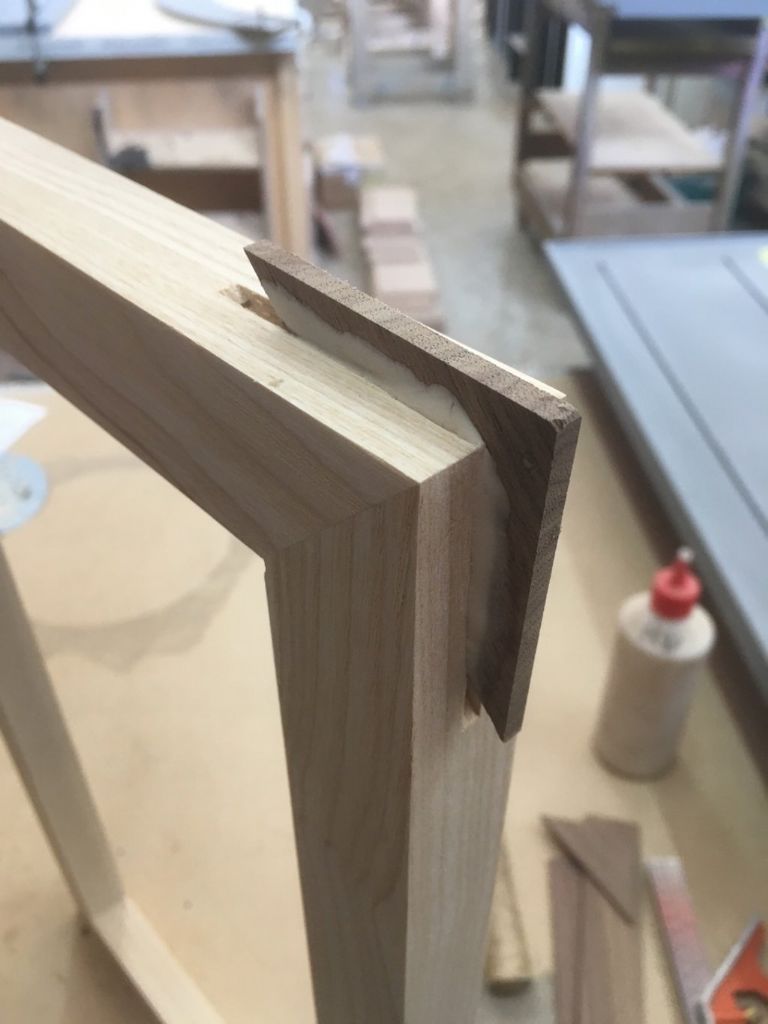
Walnut mitresThe rectangles were made using FSC certified timber, which was mitred, the corners passed through a 4mm spindle moulder blade and a solid walnut spline was then glued in place, which adds a pleasant aesthetic as well as giving all the mitre joints strength. Josh also used the same ash to add two slats to the back of the frame and five slats to the base; these were all Domino jointed to the sides of the frame.
Finish & fabricThree coats of Osmo raw oil were added in order to give the piece a natural looking finish, as well as a smooth touch. For the upholstery he used a 33 grade domestic seating foam for the base and a 33 grade luxury mattress foam for the back; this allows for the base to be a little softer than the back so that the under board in the base cushion cannot be felt when the user is sitting on the chair. The upholstery was made using Camira Blazer fabric, and the colour choice was made to mimic other Vitra products in the range. Josh says that the style is fairly bold but not overly complicated: he thinks that the chosen fabric colour works well with the slight orange tint that the raw oil gives to the ash, and we couldn’t agree more!
Nathan Millar ‘Walnut and Stone Cabinet on Stand’ - first place 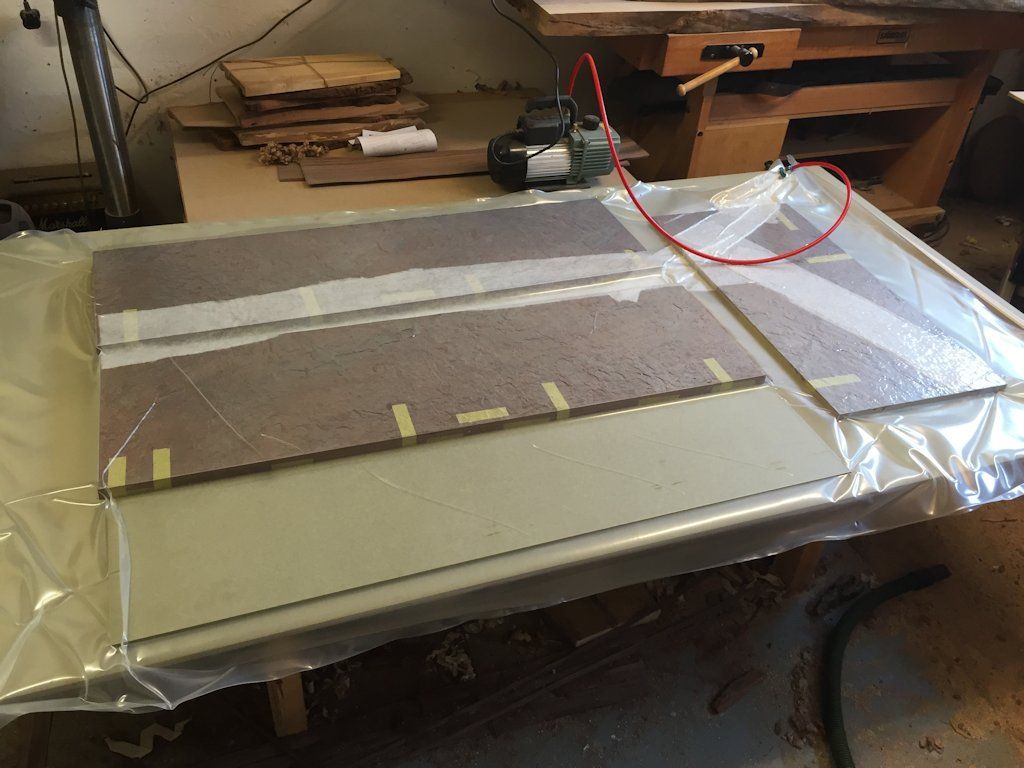
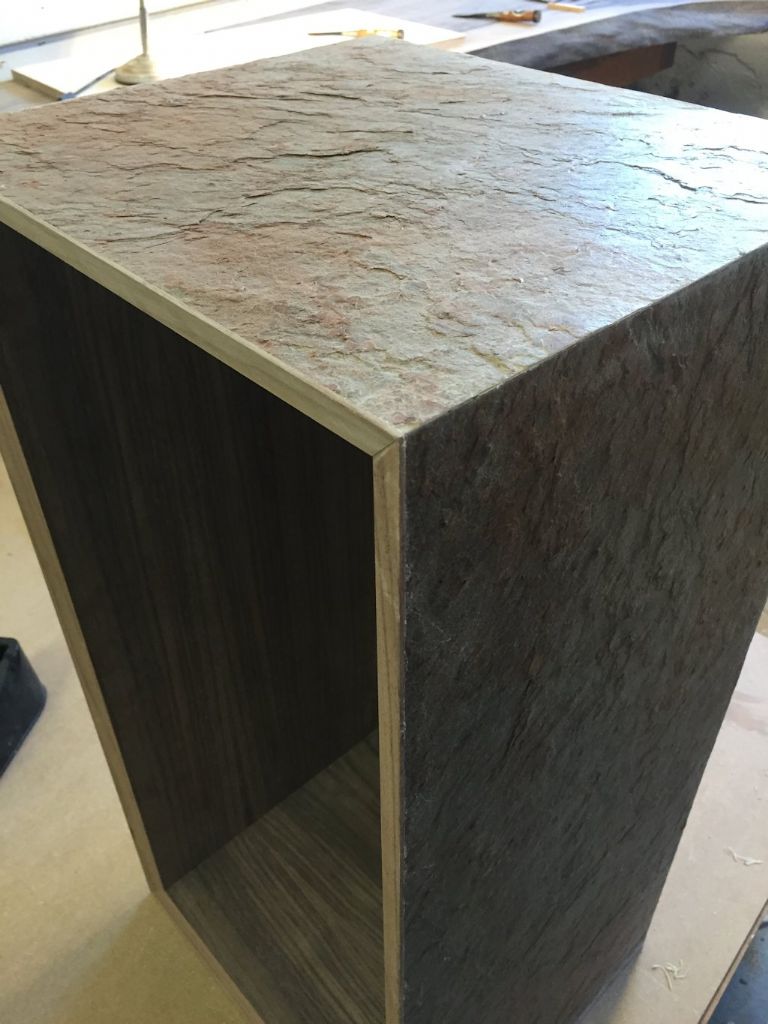 PU glue being used to bond the stone to the MDF in the vacuum bag press The main carcass starting to take shape
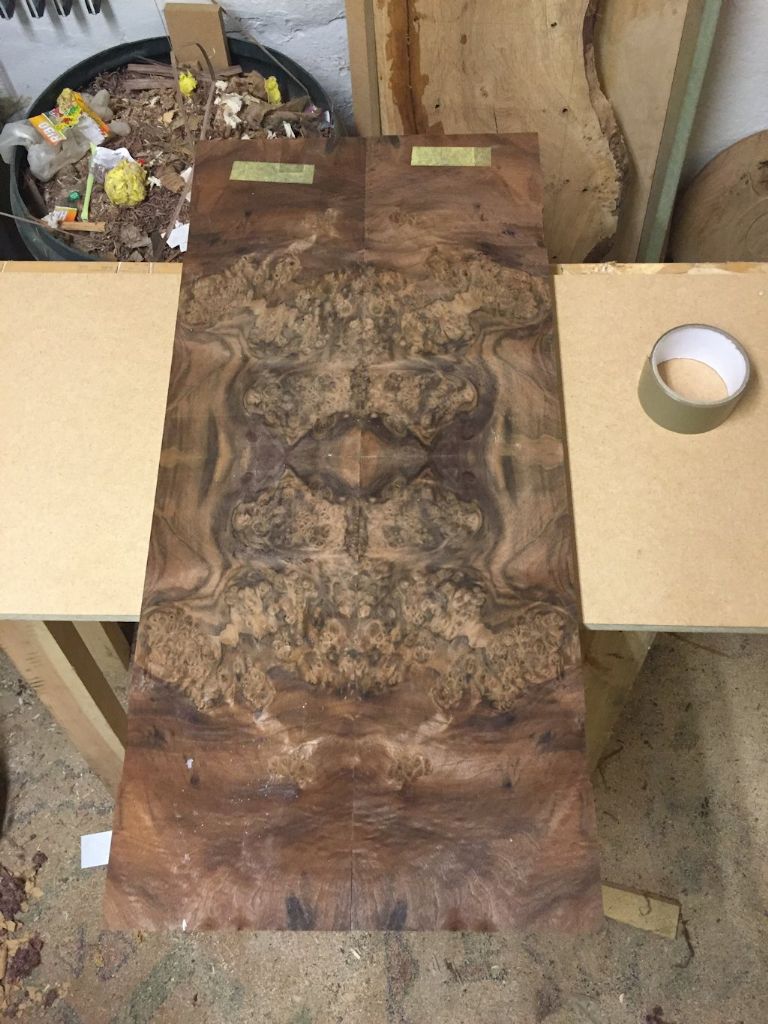
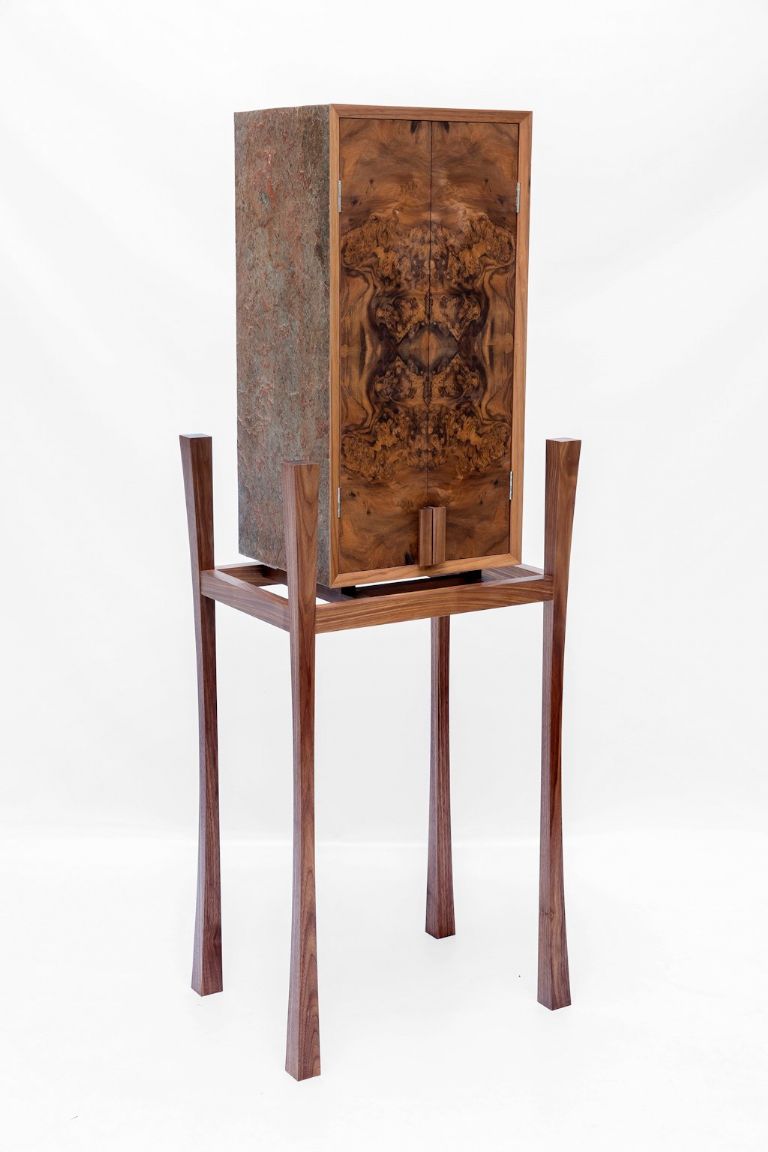 Bookmatching the burr walnut leaves Nathan’s winning entry
  The walnut legs curve inwards on two of the faces, lightening the appearance of the whole base of the cabinet
OVERALL COMMENTS: Tricky mitres; crisp appearance; very well executed; great use of stone material; lovely choice of veneer; striking appearance; professional result
25-year-old Nathan is mostly self-taught and now works for himself full-time, working on both commissioned pieces and speculative items, which he sells through galleries, exhibitions and in local shops. Nathan’s stunning piece is made using solid black American walnut, burr walnut and copper quartz stone veneer.
“I spent a few weeks thinking about designs, sketching ideas and getting samples together before I started work,” Nathan says. “I tend to spend a while thinking about designs and how the piece could be constructed before I put pen to paper and start refining and developing the ideas when sketching. I tend to choose the materials that I feel best complement each other, but also add to the design and are different enough to intrigue and make you want to touch and explore the piece.”
Nathan started by making the main carcass for the cabinet, and the cabinet box was made from 18mm moisture-resistant MDF, which was then veneered in quartersawn walnut on the inside and copper quartz stone veneer on the outside. The stone is a solid but very fine, thin layer, which is bonded to a flexible fibreglass backing. PU glue was used to bond the stone to the MDF in the bag press, and a solid walnut lipping was attached to the front edge of the carcass before he started the veneering process.
Once removed from the bag press, the carcass was cut to size and the top and bottom of the cabinet was mitred. Dominos were used to secure and strengthen the corners of the cabinet, and the back edge of the carcass was rebated to accept the back. The back was cut to size and glued in place once the main box was glued and dry.
Doors & standWith the main box made, Nathan then started work on the doors followed by the stand. He put a solid walnut lipping around a small piece of MDF for each of the doors, and used a straightedge and scalpel to cut eight leaves of burr walnut to size, to create the four lay-ons for the two doors.
He used consecutive leaves to create the two-way bookmatch. Nathan felt it was important to work on the base second to ensure all the measurements would look as good in full-scale as they did on paper: “As it happened, I reduced the length of the rails to tighten the gaps between the cabinet and the legs,” he says.
Making the baseNext, he machined the walnut for the base, including square section timber for the legs, which he then shaped by removing most of the waste on the bandsaw followed by final shaping using a jig and a bearing-guided router cutter in the router table. He then used a spokeshave to remove any cutter marks. The frame was assembled dry to see how it looked. Nathan felt the cabinet would benefit from being lifted away from the base to create a shadow gap, which would make the cabinet appear to almost float. He also made some larger rails to lift the cabinet away from the stand, then sanded and glued the stand to ensure it was perfectly square.
Handles & finishWooden handles were let into the edge of the doors and everything was given a final sand to prepare for the oiling. “I love to use Osmo oil for finishing my work, Nathan says, “I’ve found that the warm tones of the oil and the lovely sheen gives a finish that makes you want to caress the finished timber.”
|
Winners comments
Nathan Millar – 1st place
“To be chosen as a finalist was fantastic; I was over the moon! I have been told it was very difficult to choose the Final Five, and the judging day was fantastic. It was great to meet the other makers and see the other work produced. All the work was of a really high standard, so I feel very lucky and fortunate to have won first prize. I still can’t believe my piece was chosen! The judges were brilliant and lovely to chat to. It was great to pick their brains and get to know some well-known names in the industry. The A3-26 planer/thicknesser was delivered to my workshop last week and is already up and running. It is a wonderful machine and a joy to use. Thank you so much to Matthew Applegarth at Felder UK and Tegan Foley at Good Woodworking magazine for running the competition.” Josh Milton – 2nd place“Given that I’m still studying at university, it was an absolute honour for me to be selected as one of the competition’s Final Five, especially as I was competing against so many great makers. I have to thank the judges massively for choosing my chair and awarding it second place. As a new designer, it gives me a huge amount of confidence to know that there are people in the industry who appreciate my work.” |
- Log in or register to post comments


| Articles | Articles | Articles | More | Subscriptions | Resources |