Making a stable door.
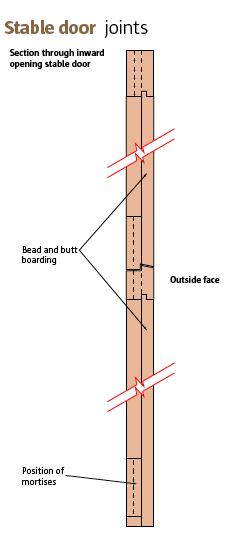
In this type of door, the thickness of both the bottom rails and the boarding add up to the thickness of the stiles (40mm). So the bottom A happy rails were finished at 19mm (3/4in), and the boarding material was then used to mark the outside face of each mortise.
The pencil lines for the mortises and haunchings are marked on the inside face of the paired-up stiles, the mortise marks only being squared across one face and then marked on the outer edges. Double lines are used on the outer edges to indicate the requirement for ‘wedge room’, which is cut later by hand.
The mortises and haunchings were cut out (I used a mortising machine with a 12mm chisel), and the stiles were then cramped together while the wedge room was cut with a 12mm mortise chisel.
The position of the mortises was now picked up using a gauge and transferred to the full-width top rails ready for cutting the tenons. Now’s the time to admit my first small error: if I had picked up this size using the gauge from the back face, I could also have marked out the bare-faced tenons without having to reset it.
The shoulders of the tenons were cut using the crosscut, and the cheeks ripped on the band saw. The final planing to size was done by hand with a badger plane; the gauge marks make it easy to see when the thickness is correct.
The bottoms of the haunchings were cleaned up using a hand router. These need to be an accurate fit since they will be seen at the top edge of the bottom door, and any unsightly gaps will also let in water.
An 8mm (5/16in) groove is cut in each stile and top rail to accommodate the boarding — a job for which I used a wobble saw in the spindle moulder; you could use a router, of course. The grooves in the stiles are stopped short of the top rails but run through at the bottom of each door. The haunchings on the tenons are then marked out, and the wedges cut from the waste area before it’s removed.
After a dry run to check that all is well, the pencil marks are planed from the inside faces of the components, and the door is glued up, cramped, and wedged together. Once set, the wedges are trimmed with a panel saw, and both faces of the door sanded down to 120-grit.
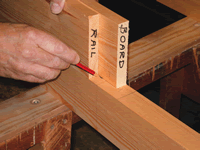
Image 1: Planing a reference face and edge before thicknessing the stiles.
Image 2: The thickness of the boarding determines the position of the mortises in the stiles.
Image 3: The mortises and haunchings are marked on the inside face of the paired-up stiles...

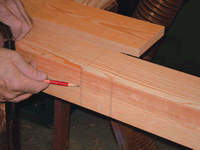
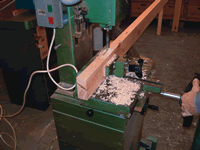
Image 4: ...and the mortise marks only are squared across one face...
Image 5: ...and then marked on the outer edges; double lines indicate the ‘wedge room’
Image 6: Mike chose to cut the mortises were cut by machine…
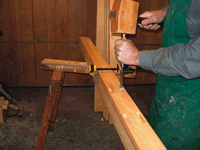

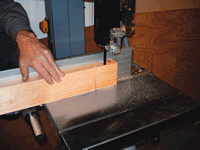
Image 7: ...but removed the wedge room by hand.
Image 8: The shoulders were cut on the crosscut saw...
Image 9: ...while the cheeks were ripped on the bandsaw.
To avoid confusion, the position of the board joints and beads was marked out on the top rail of the door using one of the moulder cutters as a template; an allowance of 1mm (1/16in) per board was made for possible expansion. The location of the beads was then transferred to the boards, and the mouldings were machined.
The boards for the top part of the door were now cut to length; a 10° bevelled cut was made at the bottom of the boards to help shed water. The boards for the bottom part of the door, meanwhile, were left slightly over the finished length.
The normal practice now would be to fasten the boarding in place by driving oval nails through into the rails, and punching them below the surface ready for filling. However, the requirement to finish the door at 40mm (1 9/16in) thick, and the boarding at 21mm (13/16in) thick, left me with a problem: 40mm nails would be too long, and 30mm ones too short to hold. I decided that the swiftest method was to screw and pellet the boards in place working from the inside face of the door.
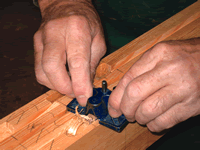

Image 10: A wobble saw was used to cut the grooves in the stiles...
Image 11: ...but a hand router is just the thing for cleaning up the bottoms of the haunchings.
Image 12: And there you have it — two doors in one.
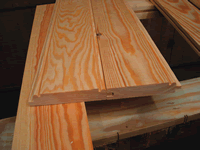
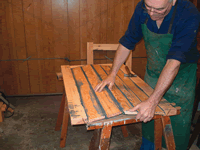
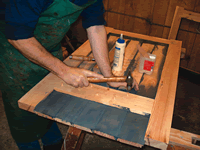
Image 13: The finished butt-and-bead joint — much more sympathetic than TGV
Image 14: The boards are sprung into place between the stiles...
Image 15: ...and then secured by screws that were concealed with pellets made from offcuts.
To do the job properly, it was necessary to paint the tenons, mortises, tongues, grooves , and the parts of the boards and rails that overlap each other. Even the wedges were driven in with a coat of primer instead of glue. Because the whole job was done with the paint wet, it was nearly impossible to avoid getting paint on yourself, your tools, and clothing. As a result, it was an unpopular job, and one used by the foreman joiner to quieten any rebellious elements in the shop! However, in spite of the trouble and mess, it really worked: joinery made in this way lasts longer in exposed conditions than that sold ‘in the white’. On the other hand, it’s never much fun to do!
In this case, or course, the door will only be exposed to the weather on the one face, so I settled for painting the tongues and grooves and backs of the boards, together with the parts of the stiles and rails that come into contact with them (I also cheated a little by letting the paint dry overnight).
The frame was then cut into its two parts and the boarding applied. The bottom section was straight-forward; the top was boarded only after the hole for the glass had been cut on the band saw. All the boards were then tapped into a good fit with the top rails.
Though I’ve been in the timber trade for more than 40 years, I’ll admit that my knowledge of the grading of softwoods remains very basic. However, I suspect that a lot of would-be woodworkers are frustrated in their early efforts by the use of poor quality timber: the softwood sold in the DIY sheds, for example, is often of a low grade and difficult to use. When I’m asked to make something in softwood, I favour unsorted timber. This is normally the best available from the local timber merchant, and is largely free of knots, durable, and much easier to work than lesser grades.
The hardwood strips for the inside of the door, meanwhile, have a rebate that’s sized to gently press on the glass and allow for a bead of sealing putty between its outer face and the outer beads.
The rebate at the base of the top door was formed by stopping the boards 12mm short of the bottom of the door. This meant that only the bottoms of the stiles needed to be rebated to match in order to complete the top door.
The bottom section of the door was finished by fitting a brace from the bottom corner on the hinge side to the top corner on the other side, which was secured with oval nails driven through the boarding. This brace was largely cosmetic, as the door can only sag out of square if the joints fail. Having said that, it might have been necessary if the door had been painted together rather than glued, as I don’t think that the joints would have been as strong.

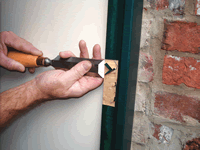
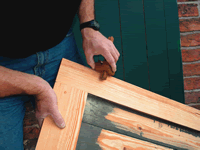
Image 16: The inside beading incorporates a rebate that secures the glass.
Image 17: When cutting hinge rebates, err on the side of caution and don’t cut too deep.
Image 18: To ensure uniformity, use a gauge to mark the rebates on the door.
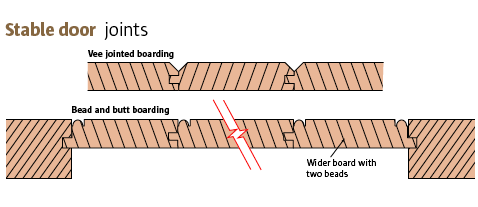
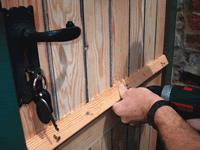
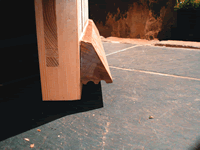
Image 19: The weather strips are bedded on putty
and screwed in position through their front faces
Image 20: Shouldn’t there be a weather strip on
the step, too?
The overriding requirement when hanging a stable door is that the hinge side of the frame must be absolutely straight in both planes. Otherwise the two parts of the door will either gape or squeeze together when it’s opened. Correcting any error in the frame is achieved by packing it out or planing it to shape. Happily, both parts of this door were straight, so all that was necessary was to plane it to fit in the frame, leaving a gap of 3mm at the bottom and a gap of about 2mm around the top, sides and centre joint. A lead, or chamfer, was also planed on the leading edge of the door.
The top section was hung first using two 100mm (4in) pressed steel hinges. The position of the top hinge was dictated by the existing hinge sinking, or rebate, in the door frame itself; the bottom hinge was placed just above the centre rail so that we were not screwing into end grain. The positions of hinges were then transferred from frame to door, and the rebates themselves being marked with a gauge to ensure uniformity. Remember, though, that when rebating hinges it’s better to err on the side of caution, so start by making the recesses a little too shallow; cutting them a little deeper beats having to pack out the hinges!
With the top section in place, we repeated the operation for the bottom section after trimming it to height. Initially, we allowed a gap of 6mm under the bottom of the door, which was later fettled to accommodate a slight unevenness in the floor. With both parts of the door hanging, we could now check that all the gaps were not only even, but remained so when the door was opened.
To judge the correct length for the weather strips, a pencil mark was made on the face of the door at each side. When the moulded strips had been cut, they were bedded on a generous amount of putty that served to seal the gaps between the boards. In this case, the weather strips were screwed through from the front face, since the holes were to be filled and painted over. Alternatively, they could be screwed from the back face, and the screws concealed by using pellets as before.
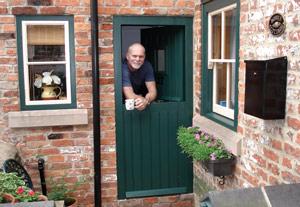
The weatherproofing for the bottom of the door is comprised of a moulding that screws to the door, and a hardwood threshold strip that is screwed to the step on top of a bed of putty or other sealant. My third and final deliberate error was to fail to take the threshold strip with me on fitting day! I solved the problem by taking it a week later when I went to photograph the happy owner looking out over his newly painted door that satisfies the demands of both heritage and marriage.
- Log in or register to post comments


| Articles | Articles | Articles | More | Subscriptions | Resources |