Saw Sharpening Masterclass - Part 1
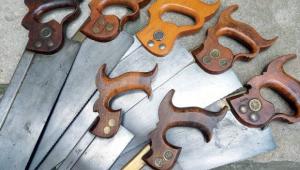
Tenon saws are arguably in equal supply, though for good quality there is limited availability. There are still people manufacturing them, but the attention to detail afforded to the back saws is less on the hand versions; while the steel is good quality, it’s the work that goes into the handles where there is a definite downturn from old saws.
(Wenzloff’s saws are an exception to the rule, of course, replicating handles of older saws with exotic timbers.)
The thing is, whether you opt for an old or new saw, owning one is of little use if you can’t keep it sharp. A blunt saw will never cut properly and tends to track away from a line, while an ill set saw can either wander or jam in the kerf. It’s a fine line between good and bad.
Dark arts
Saw sharpening can sometimes seem like a black art. When I was learning – before the hardpoint saw was available – there were plenty of tradesmen who didn’t sharpen their own but sent for the saw doctor. This instilled in me the will to learn the process, not only for self-satisfaction but also to save costs! I didn’t need to own additional saws or pay for someone to do the job, after all.
In my experience, saw doc’s invariably put on a machine filing setup, which never produces as good results as a hand file touch-up. Of course, sharpening my own saws does mean I have to splash out on a decent file, but if you get into a set routine and simply touch up the saw once in a while rather than let it get so bad that it needs a major overhaul, life is easier.
Keep practicing and you’ll get better. It’s often said that learning on a big toothed saw first is the way ahead; you have more control over the file and you can see the teeth far better as you go. Even so, a saw with a ‘crocodile smile’ can still cut well as long as the tops are all aligned.
A low tooth here or there won’t be overly problematic, but just one high one will cause the saw to jump and judder in the cut. It can also cause it to stick enough that you follow through on a stroke and bend, buckle or kink the blade. The back saws are less prone to blade kinks as you tend to not only have a more genteel approach on finer cuts, but the stiff back supports the blade well, even though it is finer gauge steel than a handsaw. The better quality handsaws are often taper ground, where the back of the blade is marginally thinner than the toothed edge, allowing you to apply less set so the cut is cleaner without the binding on the back.
You can see on some bigger saws a ‘breasted’ tooth style. This is a defined curvature in the teeth, with it higher in the middle. This is meant to mimic the swing of the arm as you saw, so that the teeth get better contact throughout the cut. It’s something you can try yourself by applying extra pressure at the toe and heel of the blade as you top it until a light arcing is formed.
Basic saw types
Categorising joinery and cabinetry saws calls for two distinct groups of handsaws and back saws, though there are variations within each group. Let’s start with back saws.
I was taught that the blade and tooth size determined the tool. Dovetail saws fall in around 8 to 10in long with teeth per inch (TPI) of about 15 or more, while tenon saws have a bigger range of sizes, between 12 and 18in and a TPI of between 12 and 14 and occasionally less. Some older books such as George Eliss’ Modern Practical Joinery refer to saws over 14in long sometimes being called ‘sash’ saws. There’s also the carcase saw, touted by the Americans, but for me this is just a small open-handled tenon saw.
As for handsaws, there are three distinct styles – rip, crosscut and panel, and if you think about table saws the same principle applies with either the machine itself or the blade used designed to similar ideals.
Blade length and tooth size and style determine the saw and its use. Panel saws average around 20 to 22in long with the TPI usually between 10 and 12, while crosscuts are around 22 to 26in with teeth from 6 to 9TPI, while the rip is usually 24in and longer with teeth from 3 to 5 TPI. But the beauty of any saw is the ability to file it to suit your own purposes.
Tooth styles
There are a few considerations when determining how a saw performs, including pitch (or rake) of the tooth, the bevel and the set worked upon it. All three can be altered to suit the work you’re carrying out.
The pitch of the tooth is taken from the angle at which the front of the tooth addresses the work. On a rip pattern saw, this is often 90° and is very aggressive, although I tend to drop this back by roughly 5° as I find it lessens the jarring at the start of a cut. The more the rake is dropped back the less aggressive the action, so while the cut may be a little smoother for the sawyer, it’s a longer operation.
The rip pattern isn’t limited to big handsaws, though. A rip filed saw is now the norm for most of the high-end dovetail saws on the market as dovetail work is predominantly ripping work. The fine tooth structure on a dovetail saw is good enough to leave a clean cut on the small amount of crosscutting involved as well, especially if you knife the shoulder lines. Tenon saws can be rip filed as well. I keep one filed for crosscutting the tenon cheeks away. The other is rip filed for ripping the cheeks down.
Crosscutting handsaws are often raked at around 70° to 80°, but you now introduce the bevel on the tooth by pointing the file forwards on the front of the tooth. This introduces a forward facing point on each tooth, scoring the cut much the same as a marking knife so that the edge of the cut on cross-grain work is cleaner, minimising breakout on the grain.
Altering the bevel is the most effective for setting the saw up for hard and softwood. The blunter the angle of the bevel, the better it is for durability as the point of the tooth is better supported, but the cutting action isn’t as quick.
Topping
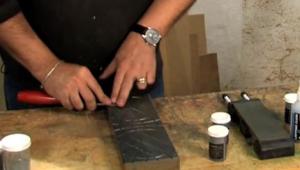
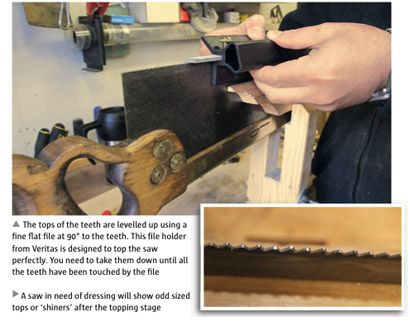 A saw in good nick won’t require this first stage if you are simply touching up the teeth, so you can skip straight to the setting and sharpening stages. For those in need, however, a flat file needs to be run across the tops of the teeth to get each one level with one another. You have to keep the file flat to get the tops aligned correctly. If you tip it slightly, one side will end up lower that the other.
Holding the file on a block of wood held against the saw side will keep the file flat or you can splash out on a specialist file holding jig such as the Veritas one that ensures the topping is perfectly square to the blade every time.
A topping cut is usually needed and a fair few touch-up filings will be done to bring it back into check. Once properly topped the teeth will usually have flats of differing sizes indicating the higher and lower teeth on the saw, and it’s filing these ‘shiners’ back out where the art lies.
On a new saw, these tops or shiners should all be identical so you can practice simply filing them back out. This brings us to the next stage.
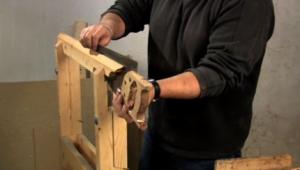
Setting
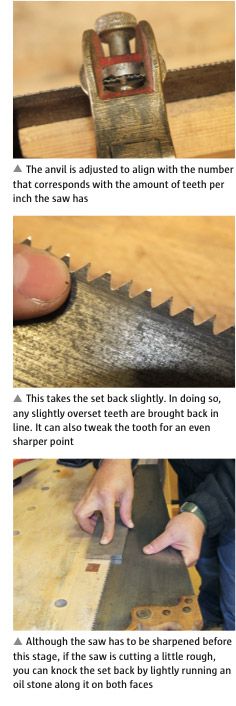 For different timbers, the set of the teeth may need to be altered. Softwoods are often resinous so can bind, whereas on hardwoods a saw set to match its points per inch size can be a tad sloppy. Setting the saw slightly over or under the PPI size can tweak the saw enough to make a difference, depending on the work it’s doing. But an overset saw can be difficult to track in a cut, so you don’t want to overset a saw that will work seasoned timber.
Excessive setting on a tooth can snap it, as can setting it against the tooth. If you get a lot of cracking noises, chances are the saw has become brittle and will cause problems. A re-cut might solve it, but if not you’ll end up with a saw that will be problematic forever and a day, and probably isn’t worth the effort.
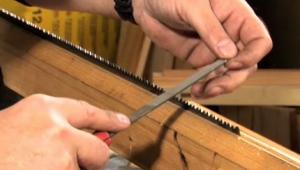
Setting pliers are a rarity nowadays. There were once plenty of variations, but I stick to an old Eclipse No77 set which isn’t now available, though there are various remakes, such as an Eclipse set of similar design from Thomas Flinn – the 94-370R (call 0114 2725387).
Pliers work on a tapered anvil with a step graduation to not only alter the amount the tooth is bent or set, but also the height on the tooth. You set the tooth about halfway down, as setting too far down to the gullet can crack and split the blade. Squeezing the handles advances the clamp to the saw blade with the small pin addressing the tooth and forcing it over against the anvil taper.
The problem with pliers, however, is the range of teeth they can deal with. Most do between 4 to 12 points per inch, which is fine for handsaws, but too coarse for tenon and dovetail saws, setting too far down the tooth.
Hand setting with a punch and hammer on a block is a traditional method, but it’s an experienced hand that knows how to do this consistently without damaging the blades. Tools For Working Wood in the USA caters for finer saws and may be your best bet (www. toolsforworkingwood.com; Tel: 718 499 5877).
- Log in or register to post comments


| Articles | Articles | Articles | More | Subscriptions | Resources |