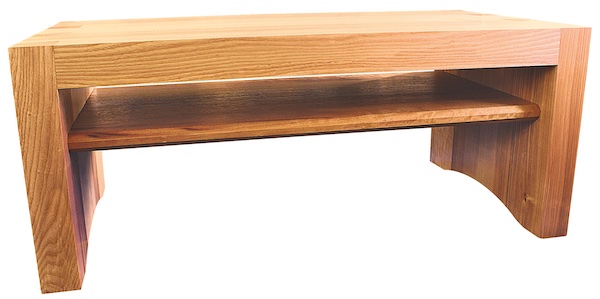
Chunky coffee table
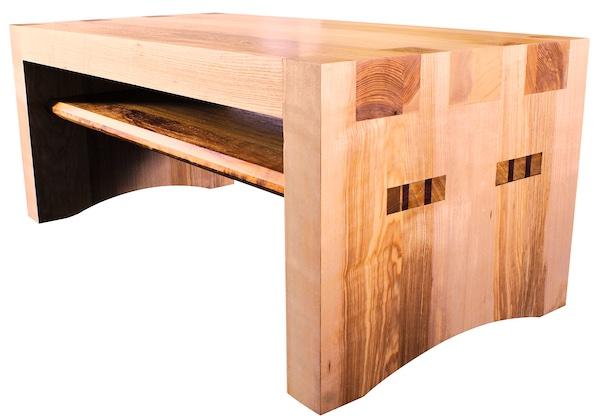
I wanted to make something that was simple in design, and yet simultaneously showed off the skills that I’d learned in my first year at college. Minimalist-styled tables with straight, angular lines interested me, so I decided on a chunky coffee table that would last for many years – making it an ideal gift for my parents.
The idea of using a box-like structure with no defined legs appealed to me as an exciting starting point. Having drawn several sketches of open-sided boxes, I developed a real feel for what I wanted, and began sketching out similar designs with really thick tops and sides. I eventually included a shelf – mainly for practical reasons – which allows magazines to be stored away very easily.
The simple design meant that I could show off the joint-making skills I’d acquired to date, so the only two prerequisites for my project actually went hand in hand. I like the idea of very visible, exposed joints, which function literally and aesthetically as an integral feature in furniture; if they’re not comprised of screws and fittings, why hide them away?
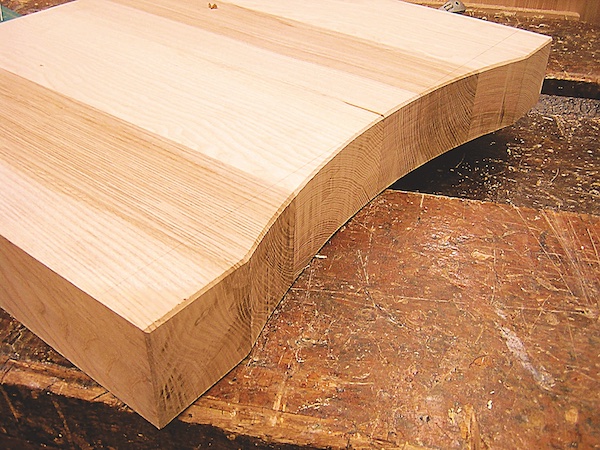
Finally, so as to balance out the table’s chunkiness, I incorporated a concave curve at the bottom of the two ends, which I thought would reduce the angular look just a little.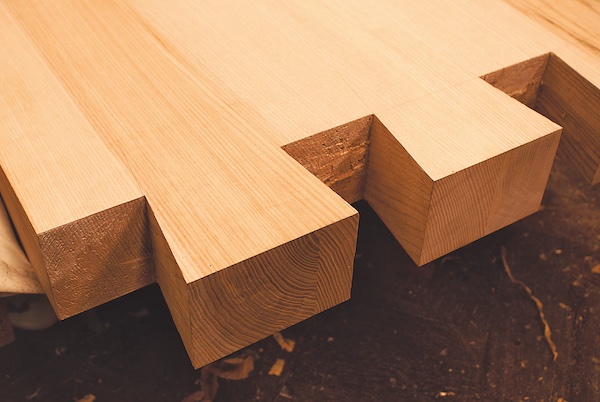
Decisions, dimensions
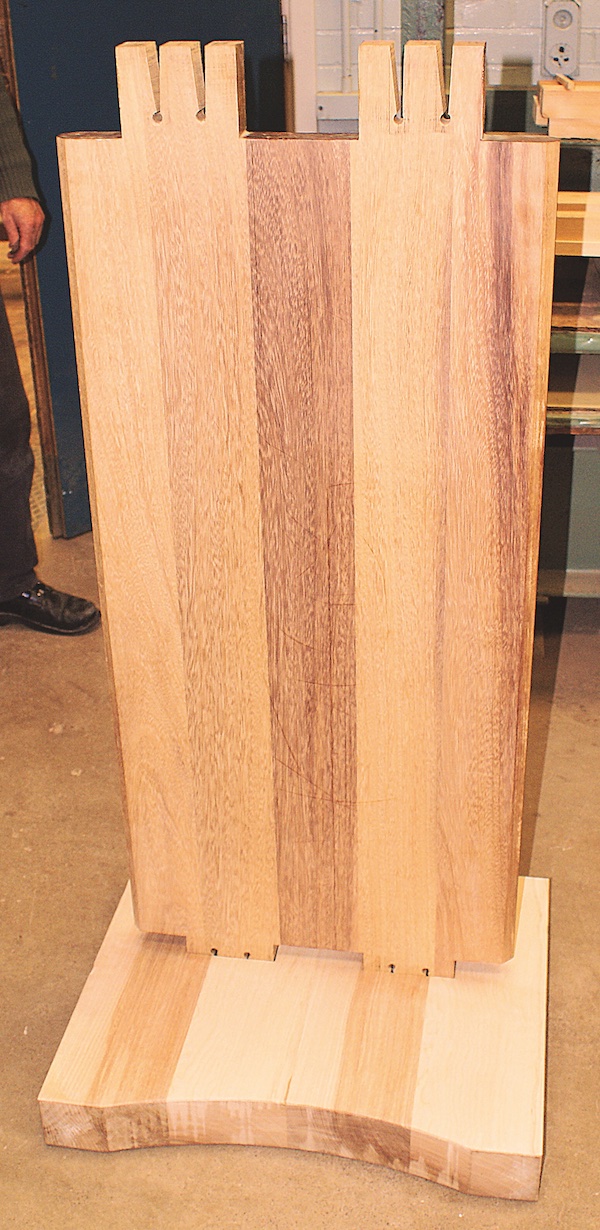
Having designed the general shape of my table, I had to decide on the best joints to use to hold it all together. It seemed sensible – considering that I was trying to show off my skills – to use joints that I was reasonably competent in making, but this narrowed my selection down to dovetails, and mortise & tenons. So, fancying a bit of a challenge, I went for a wedged mortise & tenon, as I hadn’t made one before.
Chunky doesn’t necessarily mean heavy, of course, so adding substance by using solid timber all the way through seemed like a good idea. I knew that timber up to 100mm-thick was readily available so, allowing plenty of room for planing and thicknessing, I used 80mm-thick wood for each section, with the shelf being 40mm. The footprint proportions were taken from my parents’ previous coffee table, and I also looked at other designs to get an average feel for how big a coffee table should be. I settled on a size of 1,200 × 600 × 500mm.
Timber selection came down to economics, as well as how best to complement the room’s other oak furniture. I decided to use ash, as it’s open-grained like oak. For the shelf, I wanted a darker timber so as to create an interesting contrast, and walnut seemed a good option – until I saw the price! I opted for iroko instead, which would offer me the chance to gain some experience of working with interlocked timber.
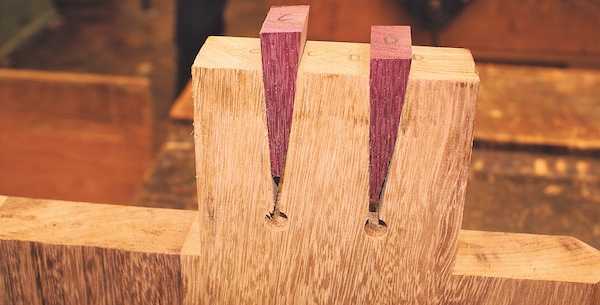
To add further contrast, wedges for the mortise & tenons would be made from purpleheart. When my timber arrived, I was somewhat surprised by the size of the boards, and a little worried about the logistics of actually chopping them up. Working out how to do this took quite a while, but I basically decided that the top and both sides would each be made from four pieces, and I’d try and match the grain round the three sides. I needed a few helping hands to manoeuvre the timber when cross-cutting it to length, then ripping down the sections, but the Wadkin dimension saw handled it with ease.
With all parts now sawn to rough size, I planed and thicknessed these down, leaving them slightly larger than the finished sizes. I used PVA and 10 sash cramps for the glue-up, and four G-cramps, as well as a couple of battens each end, to align the boards. I did think about using biscuits for alignment, but this seemed like an unnecessary complication, as the glue would be strong enough anyway. When dry, the speed-sander was used to bring everything down to the final thicknesses.
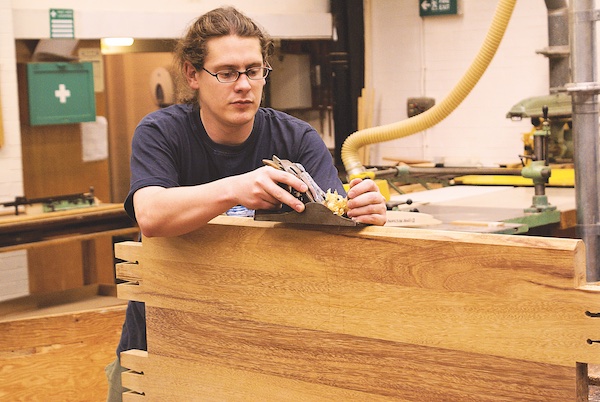
Before starting any joints, I began to shape the bottoms of the two table ends. I used a trammel to mark out the curves and a bandsawto cut out the waste, finally smoothing over with a compass plane. To remove the sharp edges, I used a block plane and convex spokeshave.
Creating the joints
I cut the tenons for my shelf over-size, as they’re through-tenons, and used a Japanese Kataba saw to cut out the waste, as well as large chisels to clean the joint. I chose the Japanese saw as it doesn’t have a back to restrict depth of cut, which makes for a very fine and fast cut. I also used a Japanese saw for the wedge mortises, drilling a hole at the bottom of the wedges to prevent them bottoming out.
Cutting all the dovetails by hand was quite a challenge due to their size, but my Japanese saw made short work of removing most of the waste. During cutting, I thought about how the tails would come together at glue-up stage, and remembered reading about undercutting them to ease assembly. This seemed like an extremely good idea as it’d stop the bigger surface area of the tails from rubbing too much. I pared the tails away to ensure that just 10-15mm around the joint’s edges would touch, meaning that the joints would smoothly ease together when it came to glue up – or so I hoped!
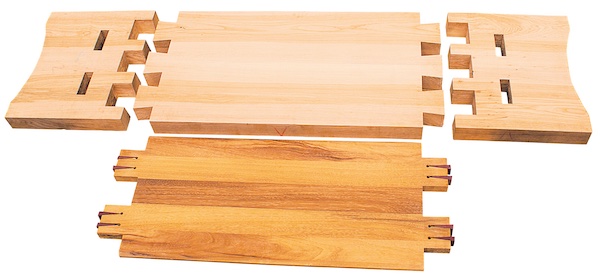
For the pins, I put one side into the vice vertically and, resting the table top on this, traced the tails. Getting it level and perfectly positioned was quite a difficult task, but after a few nervous minutes of constantly looking and checking with a square, I just had to go for it and set about marking out. I tried to use a bandsaw to remove most of the waste, but the blade broke in the process. Switching to using a jigsaw worked to a certain extent, but the blade wasn’t long enough and didn’t reach right to the other side. In the end, I resorted to drilling out the waste with a Forstner bit from both sides, and cleaning up with chisels; this prevented any damage to the shoulder line and was the best approach I could find. I cleared the shelf’s mortises in the same way.
Dry fitting & gluing up
With all jointing complete, it was time for a dry fit. Because my table was so thick, it seemed impossible to dry fit the dovetails, so there was only one chance for those – the final glue-up – which was therefore destined to be the most nerve-racking part of the entire project. However, at least I could dry fit my mortise & tenon joints, which bolstered my confidence by going together very well – so well, in fact, that it was difficult to pull them apart! Two big mallets and 10 minutes of bashing later, I had the ends free of the shelf. Consequently, I put the shelf through the wide belt speed-sander and took off 0.5mm, which allowed the tenons to slide more easily. To make the purpleheart wedges, I knocked up a simple MDF jig and used the bandsaw to cut them.
I was now ready to carry out the final fit and glue-up, which turned out to be a bit stressful. If I’d got my joints slightly out, there wouldn’t be much I could do to remedy the problem. I knew my mortise & tenons were good and tight; I just hoped the dovetails would do their job. I used Cascamite glue in a fairly weak mixture to allow a longer glue-up time and reduce ‘creep’, and clamped the shelf to the sides with big T-bar sash cramps, before putting the whole thing on a bench and attaching the top.

To do this, I dropped it onto the sides – a little bashing here and there registered it with the pins – and it began to drop down. Once I’d added the sash cramps and started to pull down the top, it was pretty much a case of turning the cramps in unison, so as to get the right amount of pressure from each of them. This worked very well, and at last I breathed a big sigh of relief.
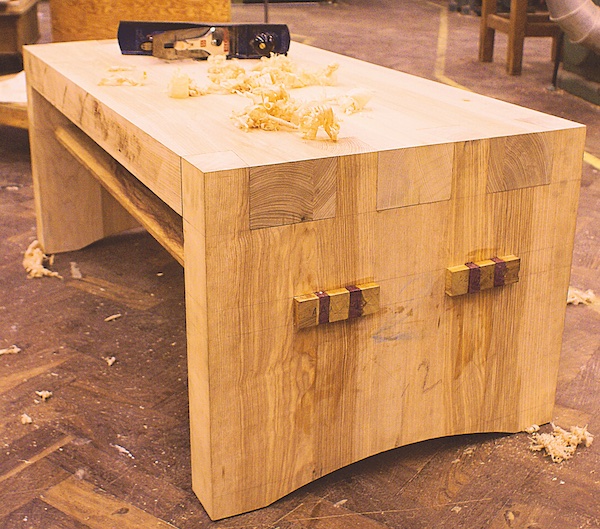
Now it was time to trim the excess from my tenons and wedges. As I said, the tenons were made over-size so that I could get a nice flush finish, and here my Japanese saw came into its own, allowing me to bend the saw as I cut and removing vast amounts of waste. A sharp block plane removed the last few end-grain shavings and my trusty old Record No.51⁄2 worked a treat for truing up the sides, creating some lovely wispy shavings in the process.
Final touches
At this stage the table was looking terrific and I couldn’t wait to get a finish on it to really bring out the grain. First, however, I picked up a power sander, starting at 100 grit to remove some tear-out, then through the following grits – 120, 180 and 240 – finishing with a hand sand at 320. This produced a superbly smooth surface, ready for the finish. Sanding highlighted some of the errors in my table, mainly with the dovetails, which didn’t quite all meet up, but as the gaps were only about 0.5mm, I was able to successfully fill them using coloured wax crayons.
I think it would be unrealistic of me to have expected to get every joint perfectly tight, as they’re huge, and I didn’t have the benefit of dry fitting to finesse them. For the finish, I considered using a spray lacquer, but it would’ve been hard to get in between the shelf and top. In the end, I decided to use Danish oil, as it’s quick and easy to apply, and easy to recoat if necessary.
- Log in or register to post comments


| Articles | Articles | Articles | More | Subscriptions | Resources |