A classic design reimagined
A classic design reimagined
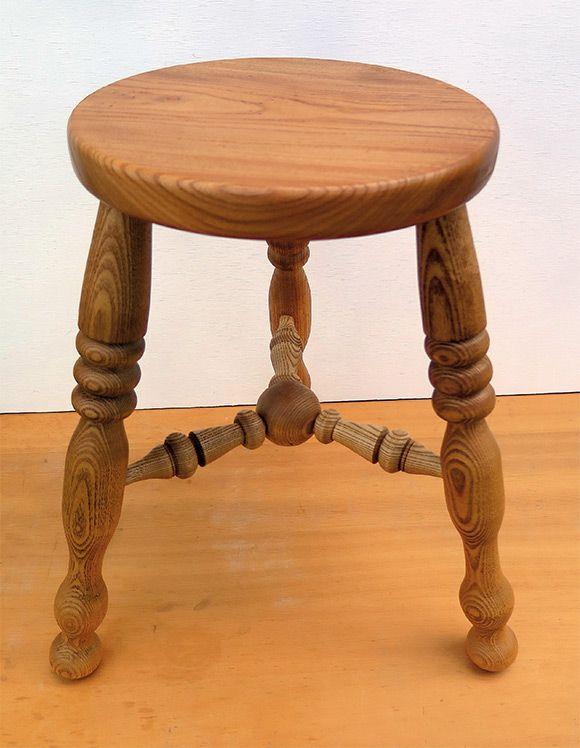
Glenn Perry makes use of a repurposed elm plank and comes up with a unique design for a three-legged stool’s central stretchers, which are cleverly joined by a central sphere
My latest project came about after a visit to a timber reclamation yard in nearby Essex. On the lookout for some plywood, I spotted a plank of timber in an oddments rack. It appeared to have been the top of an old bench or small table, as it had four holes drilled in the corners. These holes had domed bottoms, so I reckon these were formed with an old spoon bit many years ago. Underneath layers of old finishes, I recognised the timber as elm (Pic.1), and a look along its length revealed an extensive twist in the plank. I would normally reject a piece of timber that is badly warped but by using a small section, I could plane it and lose less of the thickness. The plank, at around 800 × 460 × 45mm-thick, cost me just £2.

1. Elm plank showing its origins as a bench/table
Stool considerations
While unsuitable for making a chair, I decided to make a stool. I have made a few stools before and prefer ones with three legs as opposed to four, as they are stable, even on unbalanced floors. Simple stools can be made with no stretchers joining the legs: I usually assemble mine with two joined stretchers in a T-shape. While effective, being asymmetrical, this can give the stool an odd look. For a more balanced appearance, I decided to turn three stretchers joined by a central sphere.

2. Flattening one half of the plank

3. Using the router to create a circular top
Planing the elm
My first task was to plane flat a smaller section of the original elm plank and then reduce it to a uniform thickness (Pic.2). I did this using a No.51⁄2 jack plane. Despite its reputation, the elm timber was a pleasure to work and revealed an attractive grain. From an original thickness of around 45mm, I ended up at 32mm. I created the circular seat plank using a trammel guided router with a long 8mm cutter (Pic.3). I find a stool top measuring between 275-320mm diameter is ideal. Mine ended up at 292mm.
Turning the legs
Next I moved on to the legs. I sketched a full-size design on some card, incorporating a thick central section to locate the stretchers, transferring positions of coves and beads, etc. to the edge (Pic.4). These were then transferred to the cylinders I had turned. To complement the elm top, I used ash for all the other parts. I turned three legs at 460mm long leaving a shoulder at the top and a 25mm diameter section, which would be tenoned into the seat. (Tip: to make drilling the legs for the stretchers easier when using a cradle, make a section of the leg at each end maximum diameter).
From the centre of the seat underneath, I drew a circle for the positions of the stool’s legs. As there were three, I spaced these at 120° intervals using a protractor and drew radii out to the edge (Pic.5).

4. Transferring my sketch for a leg to the turned ash cylinder

5. Marking out leg positions using a protractor
Read the full article in Good Woodworking August 2017
For more great articles subscribe to Good Woodworking today
- Log in or register to post comments


| Articles | Articles | Articles | More | Subscriptions | Resources |