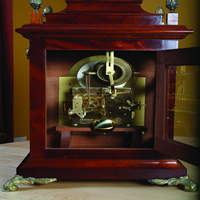
Georgian-style bell-top clock

This clock isn't a copy of a particular timepiece, but simply reflects a style that belongs to the early eighteenth century. It incorporates a bell-top moulding as well as pierced fretwork to let the sound out, and features attractive side lights that show off the workings of the movement. The mahogany case is further decorated with curl veneer, which produces some very attractive grain patterns and markings. Getting started Most of this case is made from mahogany planed to 12.5mm thickness and joined with a combination of half-laps and rebated joints. The basic case is straightforward to make, but the circular side lights and the curved front door present some challenges, and require some cutting and routing using carefully prepared circular templates. I used Trend's circle cutting jig to make this aspect of the construction quick and accurate.
Side panels The side panels are handed because the apertures aren't central, and are probably the trickiest part of the project; I found it worthwhile to make a test panel to get the feel of what's involved.
Start by making the half-lapped frame assembly, which consists of upper and lower rails joined to two stiles. Glue it together and while it dries cut a 152mm-diameter circular template from a piece of 12mm MDF. Use double-sided tape to stick it onto a piece of slightly oversize mahogany; I use DUCK tape as it peels away from the timber easily without leaving any residue. You can now use a bearing-guided trimmer to clean up the edges of the mahogany and form an ovolo edge moulding with a 5mm rounding-over bit (mine's a TITMAN ROCB5).  As with most of the detailed work on this project, you'll get the best results if  you're able to perform these operations on a small router table fitted with a fine height adjustment facility.
  
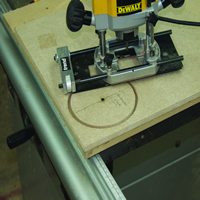
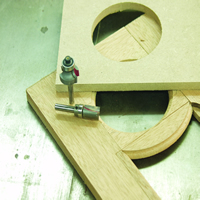
Using a router to make up the components.
Rebates and beading strip Stick the MDF template centrally on the other side of the mahogany disc, then use a bearing-guided rebate cutter to form an 8mm rebate behind the ovolo. It isn't possible to run the bearing satisfactorily against the narrow edge of the ovolo, so I used a template follower and a wooden lead-in piece which prevents the cutter snatching.

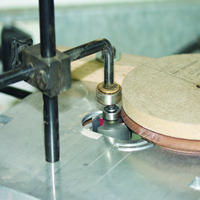
The beading strip which creates a rebate for the glass is made by moulding the edge of a 12.5 x 6mm strip of wood with the rounding-over bit. For better control, try cutting and planing the strip to size, and then fitting it to the edge of a wider board with double-sided tape. This provides the necessary support on the router table, and when the edge has been moulded it can simply be removed and used. Next, rebate the frame stiles and the lower rail for the beading strip.

The curved segments Cut two segments from the mahogany disc, checking that the grain runs horizontally across the pieces, and fit these into the case sides. Measure the width of the segment across the inner edge of the ovolo and trim the ends to fit into the case side. When you're satisfied with the fit, glue both segments in place. Use a sharp chisel to square up the corners of the frame rebates, then mitre the ends of the beading strip. The underside of the upper ends of the beading strips need to be carefully trimmed with a chisel to fit over the ovolo on the curved segment. Again, when you've achieved a good fit, glue them into place.
Cutting the holes To cut the 92mm diameter hole in the upper part of each case side, you need to make another MDF template. Mark the circle onto the case sides with a pair of compasses and a sharp pencil so that you can accurately position the template. Use a jigsaw to roughly cut out the circle, then stick the template down and use a template trimmer to cut back to the line. Set the cut depth of the rounding-over bit to match the moulding on the rest of the casework, then form the ovolo around the hole. Finally, cut the glazing rebate, then sand the outside surfaces level and smooth. Cut the various rebates on the inside of the case side with the help of a straight guide clamped on the router table.
 router cutters
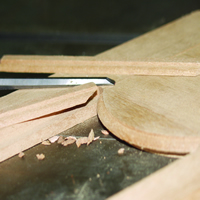
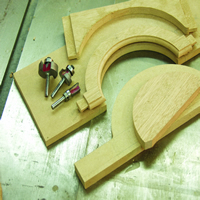
Cutting out the curved profiles.
Veneering made easy
Glufilm is a great aid to veneering. Essentially, it's a sheet of dry adhesive on a backing of paper that's cut to shape and tacked in place with a warm iron. The backing paper is then removed, and the veneer is laid in place on top and pressed into place using a warm iron - the wool setting is about the right temperature, and five or six seconds will do the job without risk of splitting the veneer - followed by a roller. The main advantage of this method is that should something go wrong, the application of a little heat allows the veneer to be repositioned or removed and replaced.
Veneering The otherwise plain mahogany grain on the clock sides can be greatly enhanced by using some curl mahogany veneers cut into strips and glued in place. An effective and quick method of achieving this is to use Glufilm (see panel). Alternatively, you can use PVA, which should be spread evenly using a wallpaper seam roller. Veneering the horizontal parts of the case side are best carried out first, using a long ruler to trim the vertical overhang level so that the two side strips butt up neatly. The circle for the upper part is best cut using an MDF template.
Continuing work on the case The back panel is a half-lapped frame that fits into the rebates in the back of the case sides. The dial mask is made in the same way but with an arch cut to suit the clock face. An MDF circle makes a useful template when cutting a neat semi-circle. The dial mask slides into the grooves cut down the case sides, but shouldn't be glued into place until the front face has been polished otherwise you'll find it difficult to work into the corners. The floor on which the movement sits and the base into which the brass feet are screwed are pieces of veneered MDF. The top panel is a half-lapped jointed framework of mahogany timber providing a hole in the centre to allow the sound to escape up and out of the fretwork under the bell top moulding. When all is dry and square, the rear face and top can be veneered in a similar way to the case sides.
  
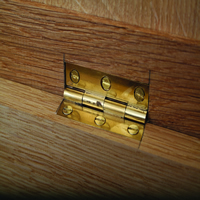
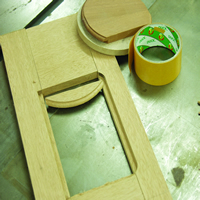
Checking alignment, fitting the hinges and the clock mechanism visible from the rear of the clock.
Making the front door With the case basically made, attention can now be turned to the front door. This, too, is quite tricky to make and again it's worth making a test piece using scrap wood. The basic door consists of a mortise and tenon frame with a semi-circle shape tenoned into the door sides to suit the dial arch of the clock face. After cutting the top and bottom rails, cut a piece of mahogany 230 x 110 x 12mm. Then, using a rebate cutter in the router table, cut the tenons along the ends to suit the cutter used to cut the mortises. When it comes to forming the inner semi-circle, make a semi-circular template from MDF and use a trimmer to out the shape, followed by a rounding-over bit (once again, I used the ROCB5) to form the beading along the bottom edge and around the inner circle. The template is replaced with double sided tape and the rebate cutter and template follower used in the router table to cut the rebate for the glass. A further template is made to mould the upper curve of the door arch. Careful measuring and placing is required to ensure that the piece results in the dimensions shown on the plans. When using the trimmer to shape the sides, you'll find that the cutter won't reach into the inner corners, so a sharp chisel will be needed to trim this area to give the required shape. The top edge is planed flat to fit against the under side of the top rail. Before gluing everything together, the rebate cutter is used to cut the rebates for the beading strip to fit into in a similar fashion to the case sides remembering that the rebate is only cut as far as the break arch rail and not the top of the door corners. When satisfied that all goes together the five components are glued together and allowed to dry flat under a suitable weight. The front of the door is veneered in a similar way to the case sides and sanded to a finish. Before veneering the face of the door it is worth veneering the door edges first for a neater finish. The last thing to be done before the construction of the door is completed is to use a trimmer fitted with a bearing of a slightly smaller diameter to cut a rebate to form the lip in the back of the door around the two corner areas where the fret work will fit in. This is a particularly delicate area requiring the depth of cut to be increased very slightly after each pass of the router. Again a sharp chisel will be required to trim the internal corners where the cutter will not reach.
Bell ringer
Originally, a clock of this size would have housed a movement similar to the Kieninger RWU03 movement, which strikes on nine bells instead of the more common bars. This makes for a much deeper movement, and consequently a larger case. As well as telling the time, the original movements would also have played tunes, which is why pieces of this sort were commonly known as musical clocks. If you prefer something simpler, however, the standard 200mm break-arch dial will accept many other movements, although a smaller movement wont look quite as impressive when viewed through the sidelights. After all, watching the bells being rung was part of the clock's appeal.
Making the rear door The rear door is a simple, half-lapped jointed frame with rebates cut to take the beading for the glass; the recess for the small mortise lock is cut on the router table. After veneering the outside face of the door, the veneer is trimmed back to suit a half-round strip of mahogany glued onto the door. About 3mm of the strip overhangs the sides of the door and this acts as a dust excluder to help protect the movement. The half-round moulding isn't particularly difficult to form. Simple plane a suitable length of timber to 10mm thickness, and sawn off a 5mm-wide strip. The sawn edge of the board is also planed smooth, and the two parts are rejoined using double-sided tape. It's now a simple matter of rounding over the edge of the timber with a corner bead cutter (I used a Titman CBC48). When completed, the strip is removed and cut to length before gluing in place on the door. When you fit the hinges, the overhang will cause problems when opening the door. This is cured by setting the fulcrum of the hinge on the edge of the beading.

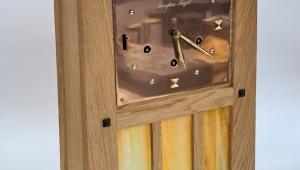
Making the upper and lower mouldings Both mouldings are straight forward to make, and are typical for the period of this clock. A small strip of 3mm-thick timber is mitred and glued in place over the main moulding after the main section was glued around the clock base. The upper moulding was made in two pieces. The half-round beading is made in the same way as that for the dust-guard on the rear door. The ogee is formed using a cutter (in my case, a Titman OG1920), and a small half-round beading is glued in place to complete the moulding. Remember to fit the upper moulding after the door is in place so that the moulding can be positioned accurately, and to fit the half-round beading in place after the main moulding has been fitted so that you'll have a suitably flat surface for the clamps you'll need to hold the mouldings in place.

Making the bell top The bell top on this clock is typical of the Georgian period and is comparatively simple to make. The lower half is made from an easily worked, stable timber such as lime, and shaped with a quarter-round scratch stock that can be made from an old cabinet scraper fitted into a handle of plywood and scrap timber. The majority of the waste was removed on the router table using straight cutters fitted to the router table, before using the scratch stock to form the final shape. This isn't as difficult as it sounds: simply hold one end of the timber in the vice, and pulling the scraper backwards and forwards until the required shape is formed. The upper half of the bell top, meanwhile, was cut on the router table using a Titman ROCB25 cutter. Veneering the top is a little trickier, but the end result is worth the effort. If you don't have a veneer press, you can make one from a box filled with dry sand with which to press the veneer onto the moulding. As you can see from the pictures of the finished clock, the grain of the veneers flows through from the lower to the top half as well as being reverse matched around the sides. This obviously requires a degree of accuracy and care in cutting, and you'll find veneer tape useful when it comes to positioning the veneers before pressing them into place. The moulding that separates the two halves of the bell top is made by moulding the edge of a strip of wood, cutting it to length, and gluing the pieces together to form a picture frame structure. The assembly that holds the fretwork and supports the bell top, meanwhile, is a simple frame that's mitred and glued at the corners. This is screwed on top of the clock case from underneath. The opening for the fretwork is cut using a 22mm-diameter straight cutter followed by a 25mm-diameter cutter to provide the lipping for the fretwork to sit on. Fit the bell top on top of this frame holding the fretwork. Finally, make a small lipping to glue around the lower edge of the bell top to hide the join.
TIP: When ironing veneer onto Glufilm, use the back of a wide chisel to draw the heat away and encourage the adhesive to set quickly.
Finishing off The clock's brassware was bought from Marshall Brass which has a wide choice of fittings, and can provide wax samples in addition to a choice of finishes for the brass. All you have to do is to drill holes to suit the various brass fittings, make the small wooden blocks that support the pineapple-shaped corner ornaments, and cut a simple reed moulding on the front face of the blocks using a scratch stock. When you're happy that all the parts fit together well, disassemble the clock and French polish the pieces using button polish. The glass is fitted using a bead of putty, and the face and movement are fitted following the manufacturer's instructions. Then, when the polish has fully dried, you can apply a dark wax and buff it to a silky lustre before fitting some coloured cloth to the back of the fretwork.

X