How to make spline dovetail joints
The spline dovetail is a joint that can be used both for strength and decoration. It looks especially attractive on small carcases and is very popular with boxmakers. It’s simple to make, and the only tools needed are a router fi tted with a dovetail cutter, and a tilting arbour table saw. However, you do need to make a simple jig fi rst. This can be modifi ed to suit your particular router/ guidebush combination. The design here uses a 24mm guidebush.
Start by making the jig as shown in the picture and drawing. Use 18mm MDF for strength, and make sure that the included angle is exactly 90 degrees to ensure stability. The sizes given are advisory, though keep the top plate as large as possible for maximum router support.
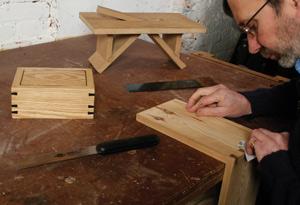
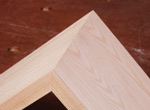
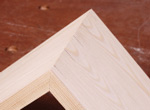
The dovetail splines are inserted through an already assembled mitre joint, so the fi rst step is to assemble the joint and glue it up. It’s a good idea to use biscuits to help hold the joint in alignment.

1] Clamp your assembled mitre joint in the bench vice so that it faces upwards
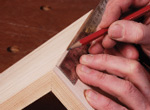
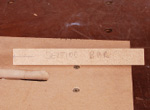
2] Mark out the dovetail spacings across the joint. Start about 10mm in from each edge for the outside pair, then divide the space in between equally across the joint
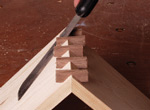
3] The clearly marked-up workpiece is now ready for machining. Fit the router with a guidebush and dovetail cutter
4] Make a setting bar to help you set up your jig accurately. This should fi t snugly in the guidebush groove and have its centre clearly marked
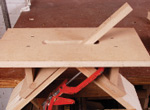

5] Insert the setting bar through the jig and line it up on the fi rst of the marked lines on the joint below
6] Clamp the jig in place so it fi ts squarely over the mitred workpiece. Check its alignment again with the setting bar
7] Stand the router on the jig and plunge the cutter until it touches the joint. Set the depth 10mm below this. Pull the router back, plunge to full depth and lock it down
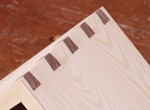
8] Start the machine and run it through the joint. Switch off without releasing the plunge lock. Re-set the jig and repeat for all the marked positions across the joint
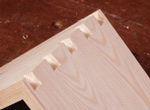


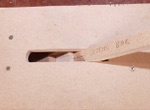
9] After machining, the joint has an evenlyspaced series of cleanly-cut sockets
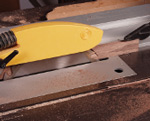
10] Remove the dovetail cutter from the router and set a sliding bevel to match its cutting angle
11] Transfer this angle setting to your table saw. The crown guard has been removed for clarity here, but must always be fi tted when using the saw
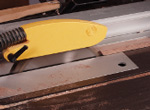
12] Set the rip fence a little wider than the base of the dovetail, and rip down both sides of your timber to make the splines. Prepare a long length; trim it to size later

13] To adjust the fi t, lay the timber on its side, and with the blade still tilted, take shaving cuts off the bottom until the piece will just fi t into the dovetail sockets
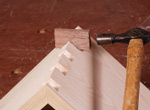
14] Cut the splines into short lengths, apply a little glue and gently drive one into place in the fi rst socket with a hammer
15] Repeat the process for the other sockets and put the joint aside to allow the glue to set
16] Trim off the waste with a fl exible pullsaw. This allows you to trim right up to the edge without damaging the workpiece
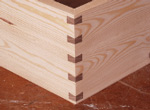
17] Finally clean up the surface of the joint with fi ne abrasive paper
18] The fi nished joint, with the dark splines contrasting well with the paler wood of the workpiece
- Log in or register to post comments


| Articles | Articles | Articles | More | Subscriptions | Resources |