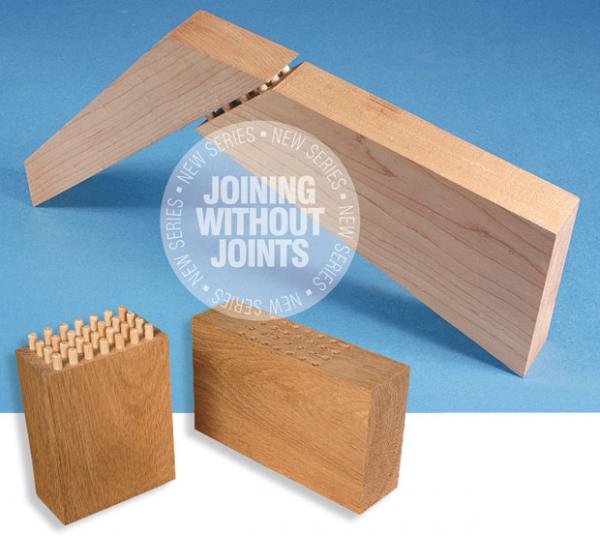
Joining without Joints – Part 1
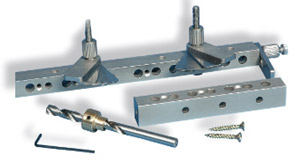
The Joint Genie System is the one I've used here
Between these too extremes there’s a broad middle ground covered by fi xing systems. This series of articles will look at the fi xings and at the specialist tools and jigs available to the home woodworker.
For me, using dowels the traditional way – marking the position of the holes and drilling them out – has always proved the most satisfactory. The problem is it’s very time consuming, and there are other joining systems that make this method redundant.
They say that the best ideas are the simplest, and this thing is simple. It’s quick and easy to set up, and quick and easy to use. It’s compact, not complicated, and I never thought I would say this about anything that claims to position dowel holes, but it really works!
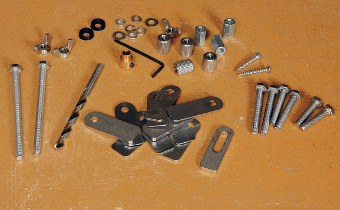
Joint-Genie is a system that can be purchased in various sets. The most popular set for the woodworker is the 8mm Craftsman, and this is the set I’ll be using here. Each set contains a selection of standard components, all available as separate parts so you can develop the system to suit your needs.
Drilling into end grain is hard work on the drill bit. There is also a tendency for the drill to follow the grain, effectively misaligning the hole. Joint-Genie’s precision-engineered 20mm deep guide bar has been designed to hold the drill bit perpendicular throughout the cut. This feature alone will ensure perfect alignment every time. A cordless drill will cope with the challenge, but a mains drill will give cleaner holes because of its much higher drilling speed.
Clamp the bar to the end of a board. It’s better to hold the board in the bench vice, although you can make the joint holding the board by hand. The bar will ensure that the hole is drilled perpendicular to the end. Bore the dowel holes with the drill set to a fast speed setting, photo 4.
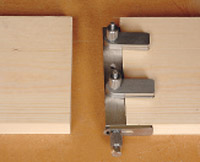
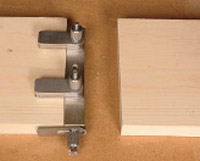
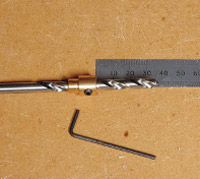
Photo 1. The Joint-Genie works by mirror-imaging its position from one component of the joint…
Photo 2. …to the other, thereby guaranteeing complete accuracy every time
Photo 3. Set the drill stop to the required depth
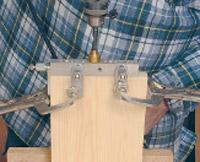
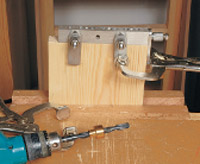
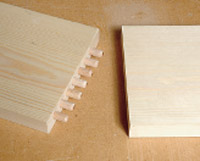
Photo 4. Bore the holes in the end of the first component
Photo 5. Rotate the tabs through 180º and repeat the process for the other component
Photo 6. Insert the dowels into one side of the joint
After knocking any debris out of the holes, insert the dowels into one component, photo 6, and assemble the joint, photo 7. You’ll see that the end result is a perfectly aligned joint, photo 8. You can make other butt joints such as tee, corner and mitre joints in a similar manner.
All the Joint-Genie parts are available separately,
so you can customise it to fit your needs
Where two pieces of sheet material are being joined to form the corner of a carcass, for example, if the material is 18mm thick the hole can be a shade over 15mm deep. The same size hole can be bored into the end of the other component, photo 9.
Although it’s possible to bore a deeper hole in this piece, there’s no practical reason for doing so as it won’t increase the strength of the joint. Also it is far too easy to drill the face board with the drill stop set to the wrong depth. It is always better to reduce the length of the dowel.

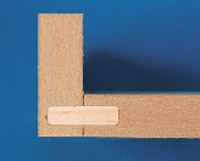
Photo 7. Bring the two components together and engage the dowels
Photo 8. The end result is a perfect fit
Photo 9. On corner joints, choose dowels that can be inserted into holes of similar depth

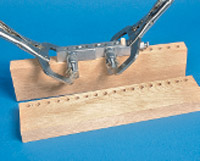
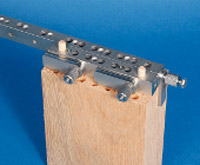
Photo 10. When face drilling, fi x the Joint-Genie to the job using screws passed through the securing holes
Photo 11. Carry out horizontal indexing by moving the tool along the job using a dowel as an indexing pin
Photo 12. Reposition the bar and drill the third row of holes
When making a corner joint, you can use the tabs to align the bar along the end of the face board. However, if the joint is positioned at some point other than the ends, use a guide line to position the bar. The end tab is still used to ensure that the edges of the boards are flush.
Further information
■ The Joint-Genie system
■ 01308 861195
■ www.joint-genie.co.uk
For vertical indexing you need to bolt two bars together, photo 12, and bore two rows of holes. You then remove the Joint-Genie and place dowels in the second row (see photo 12 again), so the bars can be repositioned and a third row of holes can be bored. You can once again repeat this simple process as many times as required to create the joint you want.
Making joints with dowels is made so much easier with a good jig system. It’s the simplicity of the Joint-Genie that is its best feature. There are no small pieces to lose, and it’s quick and very easy to use. Over the years I’ve tried and dismissed the use of dowels – but not any more. I’ve now used up all the dowels lying around my workshop, and have had to go out and buy more!
- Log in or register to post comments


| Articles | Articles | Articles | More | Subscriptions | Resources |