Garage door upgrade
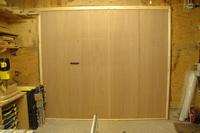
...After
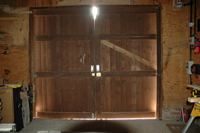
Before and...
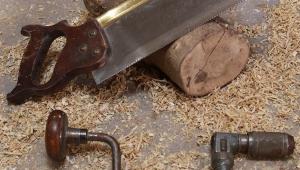
My workshop used to be a stable block and I thought that trying to insulate the whole area effectively would be an impossible task. So I just insulated and heated one of the 11ft square loose boxes and tried to work on smaller projects in the winter. This year I had some larger commissions and needed to work through the cold weather. I then had a little accident. I was planing the edge square on some timber. Someone walked into the workshop and, as I looked up, the piece of wood slipped out of my cold fingers and hit the revolving blade. Fortunately the guard stopped it coming into full contact with the blade but even so it flew up and hit me across the fingers. Fortunately there was no lasting damage. So, insulating the workshop became my number one priority. Other than the extra warmth, insulating the workshop will reduce corrosion on the machinery and will provide some sound insulation.
The main workshop has a pair of sliding wooden doors which have gaps at the top, bottom and sides. I have access to the workshop through a side door so I don’t need to be able to open the main doors very often. Extra insulation would make them impossible to open. I thought of fitting two extra hinged doors to the inside, but decided they would get in the way and would be difficult to make draughtproof. This left insulated panels as the best option. The panels fit by making the top housing deeper than the bottom housing, the panel is made to size so that it can be pushed up into the top housing then dropped into the bottom channel. The opening for my workshop doors is 2700mm wide by 2375mm high and I made the new frame out of inch thick timber. If building against a brick wall, I would have used two inch thick timber.
I want to be able to take all the panels out in the summer and store them out of the way so this limited the size of each panel. I decided on a 600mm width to most effectively use 1220mm wide sheets of ply and minimise the number of draughty gaps.
If the doorway had been perfectly square it would be possible to make all the panels square and just fit them in place, but mine are slightly out of square. Fortunately for me the opening is narrower at the top which makes fitting the doors with a smaller key section relatively easy.
Make up a ply & batten frame
Step by step guide
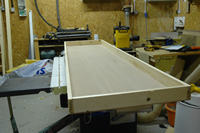
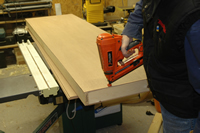
1 Cut four sheets of 8x4ft 6mm thick plywood down the middle, then cut them to length. Glue and pin 3x1in battens to all sides then fill with 65mm thick fibreglass slab insulation. This is unlikely to slump over time, and is a thinner section than the depth of the housing to reduce the amount of ‘bellying’ of the panel.
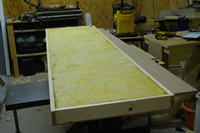
Fill with mineral wool insulation
2 Staple a sheet of polythene over the insulation to provide a vapour barrier before fitting the top piece of ply. Use a nail gun and plenty of pins or screw into place. The vapour barrier is fitted to stop warm moist air, from the warm workshop, passing through the inner plywood leaf and insulation. If it reaches the inner face of the cold outer ply leaf, it will form condensation which will damage the panel and smell.
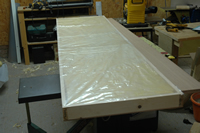
Add the polythene vapour barrier
3 I plan to leave the top and side sections of the frame permanently in position, as with a 2700mm wide opening there is plenty of space. If you plan to do the same, pin the frame in place, otherwise use screws.The bottom track section just rests on the floor, fitting inside the side frame sections so that it can be easily removed.
Fix the second layer of
plywood over the frame to
form the insulated board
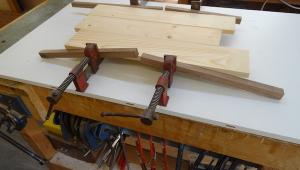
4 Measure the finished thickness of the panels, add a couple of millimetres on for clearance, and rip down four lengths of 4x1in timber to this measurement for the two sides, the top and the bottom rails. Fit the top piece then the corresponding two side pieces by pinning in place.
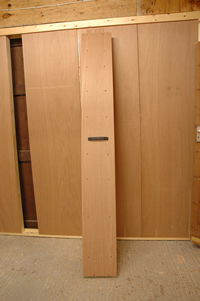
A mid-handle allows the ‘fill’ panel
to be lifted in or out of the gap
5 The top frame has two pieces of 3x1in each side to create the housing. Chamfer the edges to allow the panel to fit in easily. The side frame is 2x1in, chamfered on the outer edges before fitting. The bottom section just rests on the floor. Use a piece of 2x1in batten for the rear upright section - screwed to the bottom piece. The front upright is made from a piece of 2x1in. Cut about 15mm off the edges at an angle of 30 degrees to make it easy to fit the panels.
6 One end of the bottom section is placed in the bottom corner of one side section. Slide the other end inside the other side section to form the bottom housing. Each panel is fitted by lifting it into the top housing and dropping it into the bottom housing.
7 Fit the two outer panels and push them into the side housings; the overlap takes up any minor discrepancies and forms a good seal. Fit the next two panels into the frame; I had to try various positions for each panel to get the best seal. I had a tapering gap of about 300mm left between the panels. I made another small panel as the ‘key’ section with an oversize extra inner ply face to form a draught seal.
8 Fit an extra brace across the middle to provide support for the handle. Because the opening is wider at the top, this section can be lifted into position then as it drops down into the bottom section it forms a good seal on both sides. Fit a strong handle so that it can be easily lifted up.
Tip: Make sure that the panel side with the vapour barrier is always facing inward.
This has made a tremendous difference to the workshop, I can heat the room to a comfortable working temperature using a 2kW heater, the machinery no longer feels very cold to the touch and I don’t have any condensation forming on it. My only regret is that I didn’t do this years ago.
- Log in or register to post comments


| Articles | Articles | Articles | More | Subscriptions | Resources |