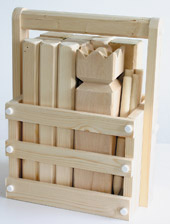
Kubb Movement ~ Game
children played they simply used logs
found in the forest
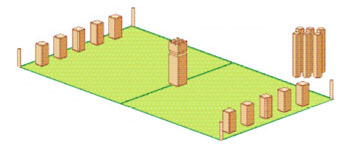
Kubb, which comes from the Nordic 'Kubspell' which means block throwing game, originated about 1000 years ago in Scandinavia and is an outdoor party game that is played by two teams that can be a single person or up to six each side. Think of it as a sort of Viking skittles that can be played on any flat surface, grass, gravel or even snow are all acceptable (Fig 1). There are no balls to throw but the skittles or blocks as they are called are knocked down with throwing sticks. The game is gaining in popularity and spreading outside of the Scandinavian countries.
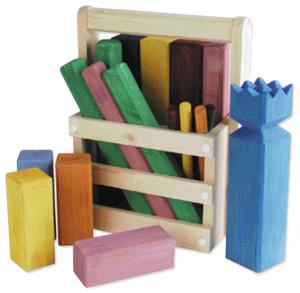
The pieces can be made from any type of wood but obviously if they are made from hardwood they will last longer. There is evidence that when Viking children played they simply used logs found in the forest. Because the blocks are quite heavy I made a crate to carry them onto the field of play.
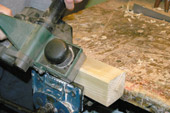
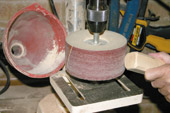
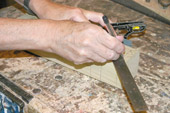
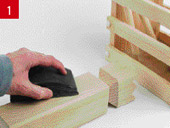
All of the pieces are relatively simple to make and if needs be can be made with a few simple hand tools but of course using power tools speeds the job up. Start with the blocks (L), which are the equivalent to skittles. They are rectangular blocks of wood with the corners chamfered to improve the appearance (Pic 1). Next make the six throwing sticks (J), which also have the edges chamfered with a plane and rounded ends which is done using a drum sander (Pic 2). Note the home-made dust control made from a funnel connected to a dust extractor. The pegs (M) for marking out the corners of the playing area are made from 18mm dowel with the ends sharpened on the drum sander.
The two teams of up to six players each spin a coin to see who starts. The teams divide and stand at their respective baselines.
The team that is going to start (Team A) has all of the throwing sticks. Team A throws all of the sticks and tries to knock down as many of the blocks on Team B's baseline as possible.
When they have thrown, Team B picks up all of their blocks that have been knocked down and throws them back over the centre line into Team A's half of the pitch. If they fail to get them over the centre line they have to try again. If they fail three times then Team A can place the blocks anywhere they like in their half of the pitch. Team A stands the thrown blocks upright where they landed.
When this is done it is Team B's turn to throw, but before they can knock down the blocks on Team A's baseline they must knock down the blocks that they threw back across the centre line.
The game continues with each team throwing the sticks alternately. If one of the team fails to knock down the blocks that have been stood up in the pitch the other team gets the opportunity to throw their sticks from an imaginary line that is drawn across the pitch in line with the first standing block on the pitch.
As the game proceeds and one of the teams thinks they can win they have to save one stick for the king. If they have one block left to knock down and only one stick left they cannot use their last throwing stick but must wait for the next round.
Only underarm throwing of batons and kubbs is allowed. Intentional helicopter throwing of batons leads to exclusion. While throwing, both feet have to be inside the sideline. For wheelchair players, the centre of the wheels counts as feet.
A more detailed version of Kubb game rules can be obtained from www.vmkubb.com

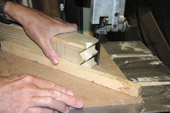
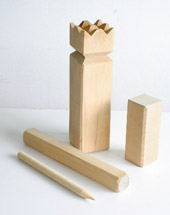
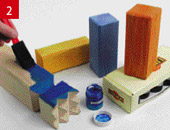
There is only one King (K) and this is the most elaborate shape. To make it start by cutting a piece of 76 x 76mm to length and chamfering the edges. Next mark the position of the decorative 'V' groove that is cut on all sides near the top of the piece. Then use a 45 degree set square to mark out the 'V' grooves on the top of the piece that represents the king's crown (Pic 3). I used my bandsaw to make the crown and to cut the grooves I made a small mitre jig that runs in the slots in the saw table (Fig 3, Pic 4). This completes the four differently shaped pieces (Pic 5).
Step 1
Step 2
Step 3
Step 4
Step 5

Step 6
Step 7
The crate is made from softwood and joined at the corners with glue and screws with plastic screw caps. I made the crate ends (A) by gluing together two pieces of tongue and groove floorboards to get the required width. The handle supports (B) were the next part to be made and after being cut to size and planed, the top ends were rounded. The handle (E) is a length of (38 x 38mm) softwood with chamfered corners. The slats (C and D) are all cut from softwood, as are the base supports (H and G). The base (F) is a piece of MDF.
To assemble the crate glue the base supports to the lower slats and the crate ends and then fix the slats to the crate ends (Pic 6). Join the handle supports to the crate ends and fix the handle between them. Finally glue the base into place. Check to see that all of the pieces fit in the crate (Pic 7).

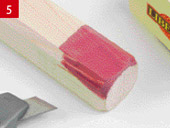
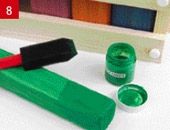
If you need a childsafe finish for any wooden toys or games, look for products that conform to EN71 'Safe for Toys'. To brighten up the parts of our game, we used a trial pack of Liberon Palette Wood Dyes. These are water-based dyes blended with resins for use on softwoods. There are 11 wood shades and 11 colour shades in the range.
How to apply
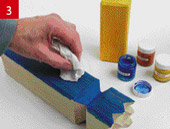
1. The surface should be dry and smooth. Rub down with abrasive paper and remove the dust with a tack cloth.
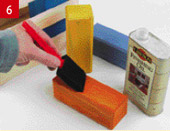
2. The best way of obtaining an even coating is to use a foam applicator. Work along the grain, giving each piece a thin coating of colour.
3. To futher even out the colour and remove any drips, lightly rub over the still wet surface with a cloth or kitchen towel.
4. These water-based dyes are easily mixed to create your own individual colours. Work with small amounts until you are happy with the mixed colour.
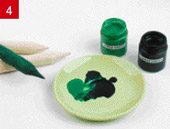
5. If you want to use two colours on one area of wood, lightly score the dividing line with a craft knife to prevent the colours bleeding into each other. Apply the lightest colour first and allow to dry.
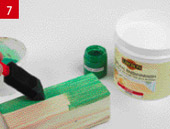
6. Palette dyes are compatible with most types of finish once they are fully dry. You could treat the surface with several thin coats of finishing oil. Oil finishes are water and heat resistant and can be refinished easily by lightly sanding and re-oiling.
7. Another finishing option is to use Liberon's childsafe Natural Finish Varnish. Available in satin or matt.
8. If you want a deeper colour, apply a second or third coat of the wood dye.
- Log in or register to post comments