Make your own try plane
I made my try plane from bubinga (also called African rosewood), although any durable hardwood will fi t the bill. I could only source 50mm thick planks, so I had to laminate stock together to get thick enough material. You will need a piece 600 x 75 x 62mm for the centre block, as well as two cheeks measuring 600 x 75 x 8mm. Rip the timber down to size on the bandsaw, then glue up the pieces to form the centre block.
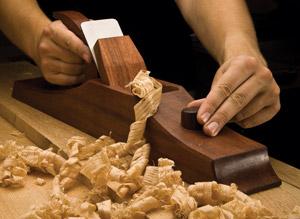
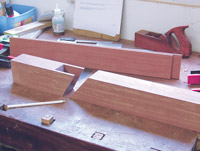
Begin by planing all the pieces fl at and true, photo 1. Then square the edges. Set aside the cheeks and set out the centre block.
Choose one face to be the sole and measure back 200mm from the toe for the mouth. Mark a line square across the sole, then mark up the sides of the plane at 50° for the bed. Then draw a second line at 60° for the abutments for the wedge. Start this line 4mm forward of the mouth.
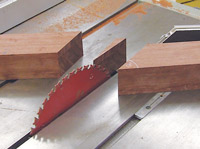
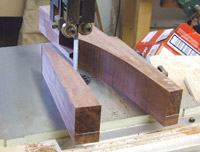
Cut the block on the table saw, photo 2, and discard the centre wedge. The larger section is the bed block (with the 50° ramp) and the smaller piece is the toe block.
Clean up the bed with a sharp block plane. With the bed fl attened, make a small chamfer on the leading edge to prevent it chipping and set it aside.
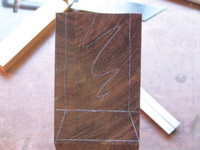
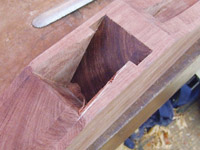
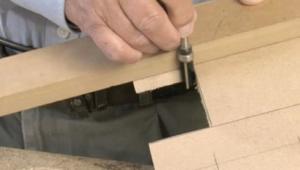
Next, mark out the abutments and throat on the front block. Mark a line across the Phil ends his series of planemaking projects with the try or jointer plane – the longest of the bench plane family PHIL EDWARDS top face of the block 170mm back from the front edge. From this line, mark down the sides of the block at an angle of 65°. Then, on the side of the block, strike a line from about 3mm above the lower edge upwards at 75°. This defines the throat.
Using a marking gauge set at 8mm, mark down the front edges and the top face of the throat on both sides. These are the abutments for the wedge. On the top face draw a line diagonally from the front edge (8mm out) back to the front of the throat. At the point where the two angles meet on the side of the throat, mark this height along the front. Make a diagonal line from this height out to the sides of the block, stopping 3mm up, photo 3. This completes the layout.
1. Plane the stock fl at and true with a jointer plane
2. Make two cuts on the table saw with the mitre gauge, and discard the centre wedge
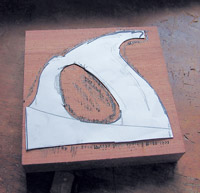
3. Mark out the abutments and throat on the top edge and front of the toe block
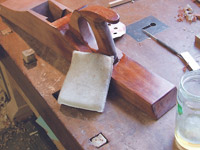
Cutting the throat Clamp the toe block in a vice and, using a tenon saw, cut to the waste side of the layout lines. I made additional cuts to make it easier to chop out the waste. Remove the material between the lines using a chisel and mallet. Cut the top section of the throat fi rst, then reposition the block in the vice and saw and chop out the lower section. With the waste material removed, use a paring chisel to clean up the surfaces. That’s the cheeks and centre blocks ready for gluing up, photo 4.
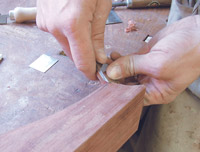
Now is a good time to make the iron, as you will need it to check the opening of the mouth. I made mine 58mm wide by 190mm tall from 3mm thick tool steel. The Woodworker April 2007 page 40 gives more details.
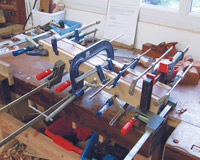
When you glue the pieces back together, position the front block so the iron won’t protrude through the mouth – leave it so the iron touches the front about 1mm up inside the throat. Apply glue to the sides of the centre blocks and sandwich them between the cheeks. Make sure the gap for the mouth is correct and start applying clamps. As you apply clamping pressure the pieces may move around and a gentle tap to re-align the pieces may be needed. Leave it overnight to cure, photo 5.
Remove the clamps from the plane and scrape off any glue squeeze out. Make sure to remove any glue on the bed and abutments, which will otherwise interfere with the fi t of the iron and wedge.
Draw a line on the top of the plane from the front edge of the abutments to the back of the throat where the cheeks touch the centre blocks. Remove this material using a rasp and tidy up with a chisel. This makes it easier to remove shavings from the throat.
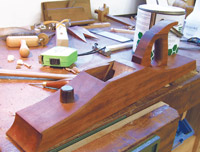
I was originally going to make this plane in the “Razee” style, with a lower rear section. But as I started to mark out the shape I realised I could easily make a more graceful design. The design ended up as a cross between the Stanley Bedrock style and a classic Infi ll style.
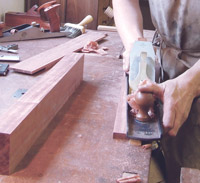
Remove the waste on the bandsaw, photo 6, and then use a belt sander to remove the worst of the saw marks. A cabinet scraper will quickly bring the surfaces to a finished condition.
4. Chop out the throat, clean up with a paring chisel and the pieces are ready for gluing up
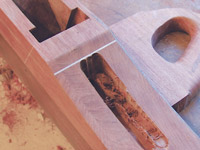
5. Use plenty of clamps when gluing the plane body together, especially at the throat
6. Mark out the plane’s profi le and cut away the waste on the bandsaw. Then sand it smooth
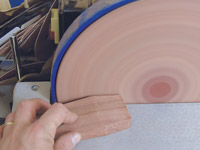
7. Use an offcut for the wedge and shape it as required using your disc sander
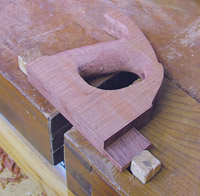
8. Mark the abutments with pencil and cut back the ears as necessary
9. Mark out the rough profile of the tote (handle) onto the timber
Check to see if the iron will project through the mouth (it probably won’t). Clamp the plane upside down in the vice and, using a small mill fi le, remove small amounts from the front edge of the mouth. Test the iron again and continue removing small amounts with the fi le until the iron just peeks though the mouth. Refi t the wedge and take a test cut. You may need to open the mouth a little more to allow the plane to cut without shavings choking in the mouth.
The tote (handle) for this plane is of the fully enclosed type. I started with a block of timber 25mm thick and 150mm square. Sketch out your design, photo 9, and remove the waste using drills and the bandsaw. Then shape the handle to a comfortable fi t, testing it with your hand. Use rasps and sandpaper to complete the smoothing, photo 10.
Mark out the mortise on the rear of the plane. Make sure the iron won’t foul on the tote when you try to remove it. Drill out the waste and then chop and pare the mortise to a snug fi t, photo 11. Glue the tote in place.
10. Shape the tote to fit your hand using rasps and abrasive paper
11. Mark out the mortise for the tote on the rear slope of the plane and chop out the waste
12. Chamfer the top edges of the plane body, and apply the front chamfers with a chisel
Turn a small knob 25mm in diameter by 50mm deep on the lathe – I used an off-cut of rosewood for this. This will serve a dual purpose – to give you somewhere to rest your thumb in use, and also to strike when you want to remove the iron.
Drill a 25mm hole 25mm deep in the front of the plane, 110mm back from the toe, photo 14. Glue the knob in place, and the plane body is finished.
13. Apply two coats of boiled linseed oil, and wipe off the excess. Then buff it up with wax
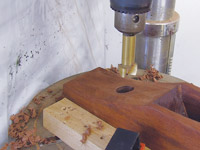
14. Drill the 25mm diameter hole for the strike button on the drill press
Sharpen the iron and set it in place. Fit the wedge and set the iron projection for a fi ne shaving – the iron should barely protrude from the mouth. Take a test cut; does it give a full-width shaving? If it doesn’t, make sure the iron is projecting squarely.
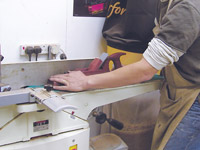
If you fi nd the plane won’t consistently take a very fi ne shaving, you may need to fl atten the sole. Stick a sheet of 120-grit abrasive paper on a fl at surface and, with the plane iron retracted but the wedge fully tightened, give the plane a fi rm push over the sandpaper. I actually used the in-feed table of my surface jointer to do this, photo 16. Take a look at the sole to see where wood has been removed. Give the plane another stroke or two to ensure that any bumps have been removed, and test the plane again. Finally, you may need to open up the mouth a little if you fi nd that it’s choking when you try to take a thicker shaving.
15. Turn the strike button to a diameter of 25mm on the lathe, and glue it in place
16. I flattened the plane’s sole on the in-feed table of my jointer
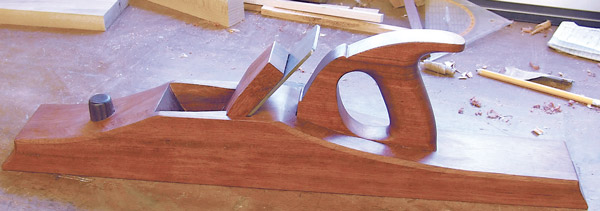
17. The finished try plane
- Log in or register to post comments


| Articles | Articles | Articles | More | Subscriptions | Resources |