Setting up shop ~ part 1

The problem with setting up a workshop is that it’s rare to have a completely clean sheet of paper on which to design your perfect solution. and you have to make do with what’s available. Usually you’re forced to convert an existing garage, shed or outhouse and this puts an immediate constraint on the layout you can adopt.
In many ways though, this actually makes the job of planning the workshop a bit easier; it can be quite daunting starting completely from scratch as you become overawed by the sheer range of options.
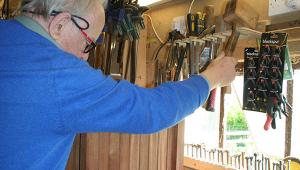
Remember that the aim is to create a warm and friendly environment in which to work, not a clinically sterile space that you’re afraid of messing up with shavings and dust. A disorganised and untidy workshop is unpleasant to work in and is probably dangerous as well, photo 1.
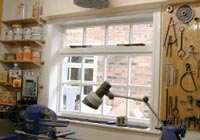
Personally, I derive pleasure and inspiration from working in a light and airy environment with everything to hand, photo 2. Using wood is a frustrating enough experience at the best of times, so try to make it as simple as possible.

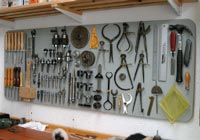
1] A disorganised workshop can be dangerous to work in, and a lot of time is wasted trying to find things
2] Organising your tools so that they’re readily to hand makes for more pleasurable woodworking
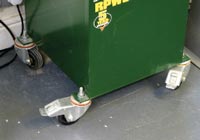
3] If you’re using a garage, bigger machines can be put on wheels to allow them to be moved to one side after use
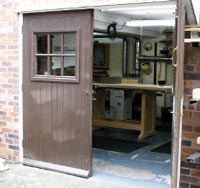
4] A wide doorway is vital, a double one even better
So what do you have to consider when planning the workshop? At this stage I’m assuming that the workshop is to be for hobby use only, but if you intend using it for business, there are a whole range of other factors to be taken into account.
Many woodworkers have to make do with a garage, and convert this, or part of it, into the workshop. And if you still need to maintain access for the car the situation becomes much more complicated, as everything has to be on wheels to allow it to be moved to one side after use, photo 3. Also consider the implications of bringing a warm, wet car into a workshop full of dry tools and seasoned timber. It’s far better to have your workshop as a dedicated building; the car is better left outside anyway!
Physical accessibility is important as well, so a wide doorway is vital, a double one even better, photo 4. If you’re using heavy machinery, the workshop should ideally be on the ground fl oor; you want to avoid having to get your table saw through an upstairs window. I know, I’ve done it!
Remember that you’ll also need to receive deliveries of materials, and to get fi nished products out of the workshop. All this is greatly complicated if you’re not on ground level.
If you want to build a permanent structure, it’s wise to check with your local Planning Authority about how big you can go. You’re allowed to make additions to your property up to a certain percentage of the existing fl oor area without getting planning permission. Sheds and other similar non-permanent structures are less regulated, and you can generally put one where you like, but a phone call to the Planning Offi ce is always wise, as there may be specifi c local restrictions in force.
You also need to be able to get to the workshop easily yourself. If it’s a hobby, you’ll want to pop out to it whenever the fancy takes you, even if it’s only for a few minutes. If the workshop is any distance away, the spontaneity and pleasure is lost. It’s far better to have something smaller where you live, rather than a grand workshop to which you have to drive.
This situation is somewhat reversed if you’re embarking on a woodworking business. In this case it is better to have the workshop away from home, and to physically ‘go out to work’ and, more importantly, ‘come home’ from it.
Consider also the social aspects of siting your workshop. If you intend using machinery or power tools, remember that they make quite penetrating noises and often for long periods of time. Your neighbours won’t be impressed if you spend hours working with a router.
Installing insulation, photo 5, will help with the noise problem and also save precious heat. In a wooden shed, lining with Rockwool and then covering this with a vapour barrier and ply or cladding provides a very effi cient and cost-effective noise-reducing barrier, photo 6.
If your structure is a brick one, the sound problem is usually less severe, particularly if it’s a cavity wall construction, but consider fi tting secondary glazing (either glass or Perspex), photo 7, keeping the air gap as big as possible. If you’re working in a garage, don’t forget the doors. The up-and-over metal type transmit every bit of sound, as well as being very cold in winter, so stick some form of rigid insulation to them.
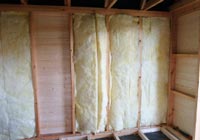
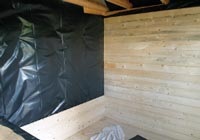
5] Fitting Rockwool or similar blanket insulation will greatly reduce the escape of both noise and heat
6] Covering the insulation with a vapour barrier and ply or timber cladding increases the insulating effect
7] Consider secondary glazing for the windows, using either glass or Perspex held in plastic framing
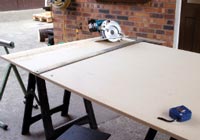
8] Big sheets can usually be cut down into smaller sections outside the workshop; few have this much free space inside
The actual space for your workshop is often predetermined and you have to work within it. If not, and you’re a lucky enough to be building from scratch, bear in mind that size does matter. Again, this comes down to what you intend making. If you anticipate machining 8 x 4ft sheets on a regular basis, then plenty of space is necessary. But remember a big workshop has to be heated, and you’ll end up walking miles in a day as you move from one part to another. The occasional big sheet can usually be broken down outside and then brought into the workshop for fi nal cutting, photo 8.
If you’re just turning, the actual working space needed is far less than that of a cabinetmaker or joiner, but it’s rare to have the opportunity to set up a specifi c turning workshop, and the lathe is often squeezed into a corner with little regard for its safe and effi cient use.
In my opinion, it’s far better to divide up the workshop into defi nite areas, with all the necessary tooling set out nearby. You can do all the machining in one space where you need lots of room, then move into a smaller area when it comes to the assembly and then fi nish in another clean area. This way you only have to heat and light the area where you’re working, and dust/mess control is much simpler too.
- Log in or register to post comments


| Articles | Articles | Articles | More | Subscriptions | Resources |