Top drawer
Towards the end of the 16th century, this weakness began to be addressed. It occurred to furniture designers that if you stack a set of smaller boxes inside a bigger box, and make sure that they are accessible from the front rather than the top, you can go straight to the items you want without unpacking everything.
To begin with, chests incorporated just a single drawer in the base, but by around 1650, drawers had become a common furniture feature and the chest of drawers, as we would recognise it today, had arrived.
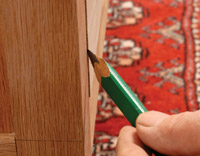
1: Check the fi t of the drawer front in its recess
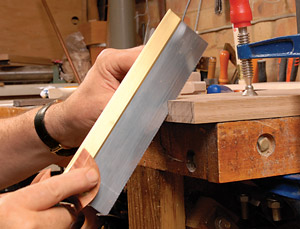
2: Use a shooting board to plane the ends square
3: Mark up the depth of the front dovetails
4: Mark the dovetail positions on the sides in pairs
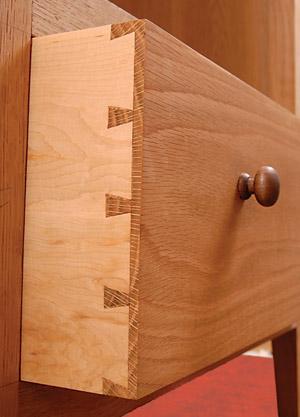
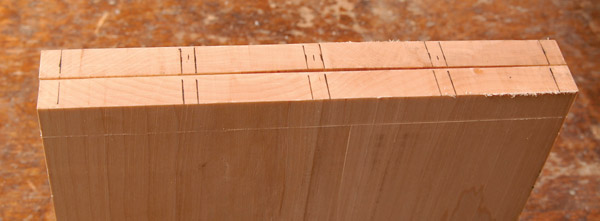
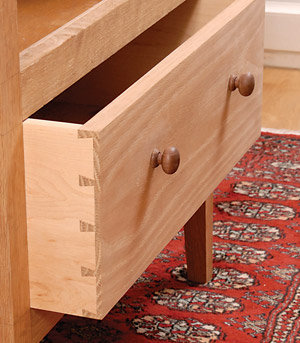
The drawer we’re making here has a traditional dovetail construction and a solid timber bottom. The front is oak, to match the wardrobe it will be part of. The sides and back are ash – this gives a nice contrast to the oak and shows off the dovetails. The bottom is Cedar of Lebanon, which has an aromatic smell when newly worked. The handles are hand-turned knobs, made from American walnut, giving a nice warm contrast to the oak.
Mark up the tails on the sides fi rst. For the front dovetails, the depth of the tail needs to be marked up on the sides and the ends of the front board. Do this with a single setting of your marking or cutting gauge, photo 3. Reset the marking gauge to the thickness of the back and sides and mark up the rear faces of these components and the inside face of the front, to defi ne the base of the joints. For a good balance, the dovetail positions can be marked up on the sides in pairs, photo 4. Mark up the dovetails from these positions with a sliding bevel. The tails are cut with a handsaw, photo 5, and chopped out with a chisel – a pretty quick job, photo 6.
5: Cut the dovetails on the sides with a handsaw
6: Chop out the waste carefully with a sharp chisel
My approach has the sides about 2mm wider than the front, so there’s a 1mm overlap at each edge. I’ve found that if you start with the boards exactly the same width as the front, any imprecision in marking or cutting can leave you with the boards misaligned – an undershoot at either the top or bottom and an overlap at the other, which has to be planed off. But you can’t easily fi x the undershoot. So I aim for a small overlap at both sides, which is then planed back. Not only does it give a neat job, but it’s easy to ensure that the drawer sits squarely on its runners. This isn’t what the textbooks say, but I fi nd that it always works for me.
For a neat fi t, you need to be sure that the dowel holes are drilled perpendicular to the face of the drawer front. This can be diffi cult to achieve drilling freehand, so I use a simple guide block drilled on my drill stand to ensure right angles. If you use a lip and spur bit, you can be sure you are drilling in the right place. Position the bit on the mark before sliding down the guide block and starting drilling. A piece of scrap clamped to the back ensures no tear out where the bit emerges.
Put a smear of glue around the inside of the hole and press the knob home. I drive a wedge into a slot cut in the dowels, to ensure a really tight fi t that won’t work loose over time. Make sure that the wedge is at right angles to the grain of the front to avoid the risk of splitting. When the glue is dry, cut off the excess dowel with a sharp chisel and sand it smooth.
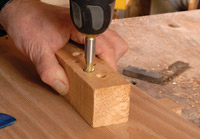
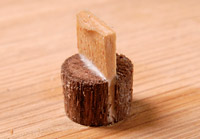
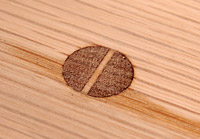
Image descriptions from left to right:
Use a guide block to drill squarely
Tap in a wedge to lock the dowel
Trim the dowel and sand it smooth

7: Use one drawer side as a support for marking up
8: Mark the joint positions with a sharp pencil
9: Define the dovetail angles with a handsaw
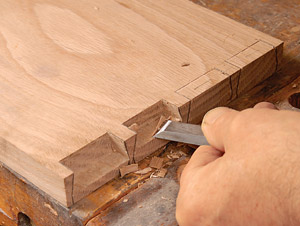
10: Chop and pare out each of the joints in turn
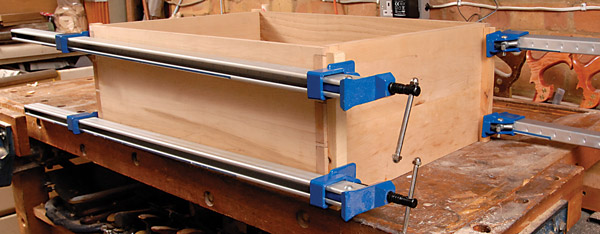
11: Assemble the drawer box and clamp it securely
You could speed it up by using a router to remove the bulk of the waste, but it’s very easy to make a costly mistake, especially as you’re cutting freehand. In this case, a bit of tough handwork was good therapy. Apply the same process to the dovetails on the rear panel. As they are through dovetails, and in an easier timber, this is a much quicker job to carry out.
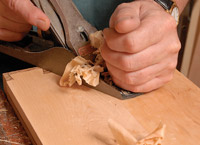
12: Plane and sand the drawer sides to a clean finish
13: Fit the drawer, mark the high corner and plane it flush
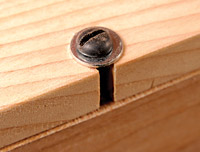
14: Screw the bottom on through slots to allow movement
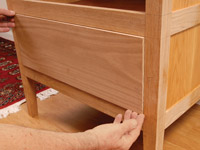
With the drawer assembled, check the fit in its opening. If all has gone well it should fit first time, but don’t be surprised of there is a bit of trimming needed to get an easy sliding fit.
For example, the opening might be slightly narrower at the back than at the front. Once it’s sliding nicely, push it fully home and check that the front is flush with the face of the drawer opening. In my case, it stood a bit proud at the bottom left corner.
If this happens, mark the corner with a pencil where it stands proud, photo 13. Remove the drawer and plane back the drawer front to your pencil lines. If you’ve taken care that the front panel was flat, any adjustments you need to make will be only minor, as it was in my case.
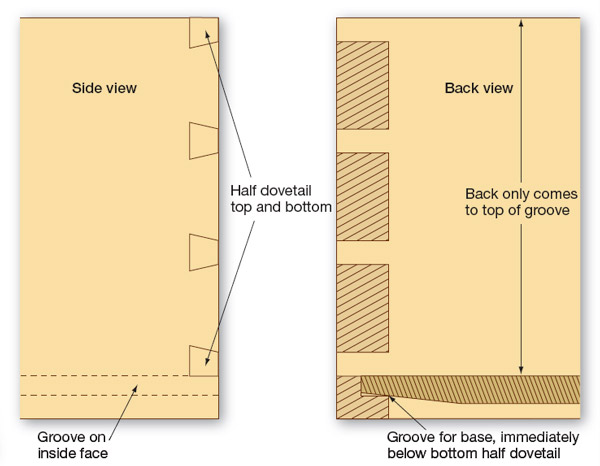
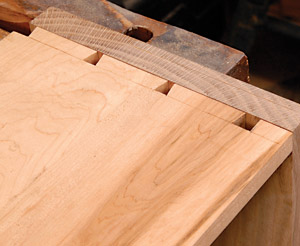
However, the layout at the back needs a bit of thought, because it’s central to the structure of the drawer. The base fi ts into grooves cut in the inside faces of the sides and the front. The dovetail design needs to accommodate this. The diagram (left) shows the side and rear aspects of the back dovetail joints. The bottom rear joint is a half dovetail, sitting immediately above the groove for the drawer bottom. The back of the drawer is not as deep as the sides, and butts against the upper surface of the drawer bottom.
If you plan this carefully, you can rout the grooves in the sides and front straight through, without stopping. This makes the job very easy and neat. The pictures show the groove geometry I used for this drawer and demonstrate the construction principles. The grooves in the side run through the bottom front dovetails and are hidden in the assembled drawer. On the drawer front, the matching groove runs into the dovetail cavity, also hidden. At the back of the sides, the groove lies directly below the bottom half dovetail.
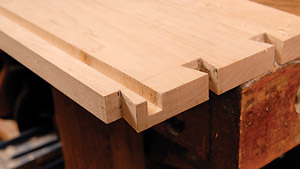
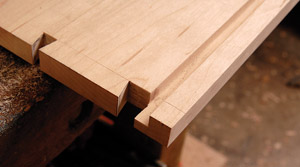
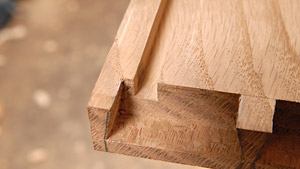
Image descriptions from left to right:
The groove at the front of the drawer side
The groove at the rear of the drawer side
The groove in the drawer front
The drawer bottom needs to be screwed in position to the underside of the back panel through slots, photo 14, to allow for this potential movement. Take care that the back is square and that it fi ts easily into the groove. If it doesn’t, you’ll run the risk of forcing the drawer out of square and jamming in the opening. If there’s any tightness in the drawer at this stage, take out the bottom and do a little fi ne tuning.
That’s it, ready for fi nishing and polishing. There’s a lot of work in making a drawer. It needs careful measurement and planning, and a lot of handwork. But if you do it well, you know it’s going to last for years, and your hand-cut dovetails will be proudly on show every time it’s opened.
- Log in or register to post comments


| Articles | Articles | Articles | More | Subscriptions | Resources |